Overview
Learn how to import .CSV data into Relate. Basic importing instructions can be found in the guide you are currently viewing. For List/Process and Linkedin import instructions, please navigate to the cards below.If you have a large amount of data, then you might want to try importing some of your customer data as a test first.
- If it all goes in successfully, then import the rest of your data in the same way.
- If any data fails to import, then check the reason why, fix the remaining customer data, and try importing again.
Deal will be integrated with Process in the first half of the year, so the import guide doesn’t mention how to import Deal separately. The basic method is the same as Process.
What you need to know before importing customer data
1. Import data types
There are four types of import type in Relate.
2. Data Field
Organization, People, Process, and List have data fields that are specific to their nature by default. They have default fields that are required to be filled in.- Organization: Organization name must be entered.
- People: You must enter either Contact name or Contact Email.
- Process / List: Check the Entry type (Organization, Contact) of the process and list and follow 1 or 2.
Organization
Organization
- Organization name (Required)
- Domain (Website): If you have a Contact that belongs to an Organization, it will automatically populate with their email domain if you don’t create a separate domain for them.
- Description
- Manager
People
People
- Contact name
- Title
- Phone number
Process
Process
By default, processes have different default fields depending on whether the Entry type is Organization or Contact.Therefore, we introduce the default fields that the process itself has.
- Value
- Status
- Assignee
- Contact
List
List
Other than the default fields for Organization and Contact, which are data types for lists, lists do not have their own default fields.
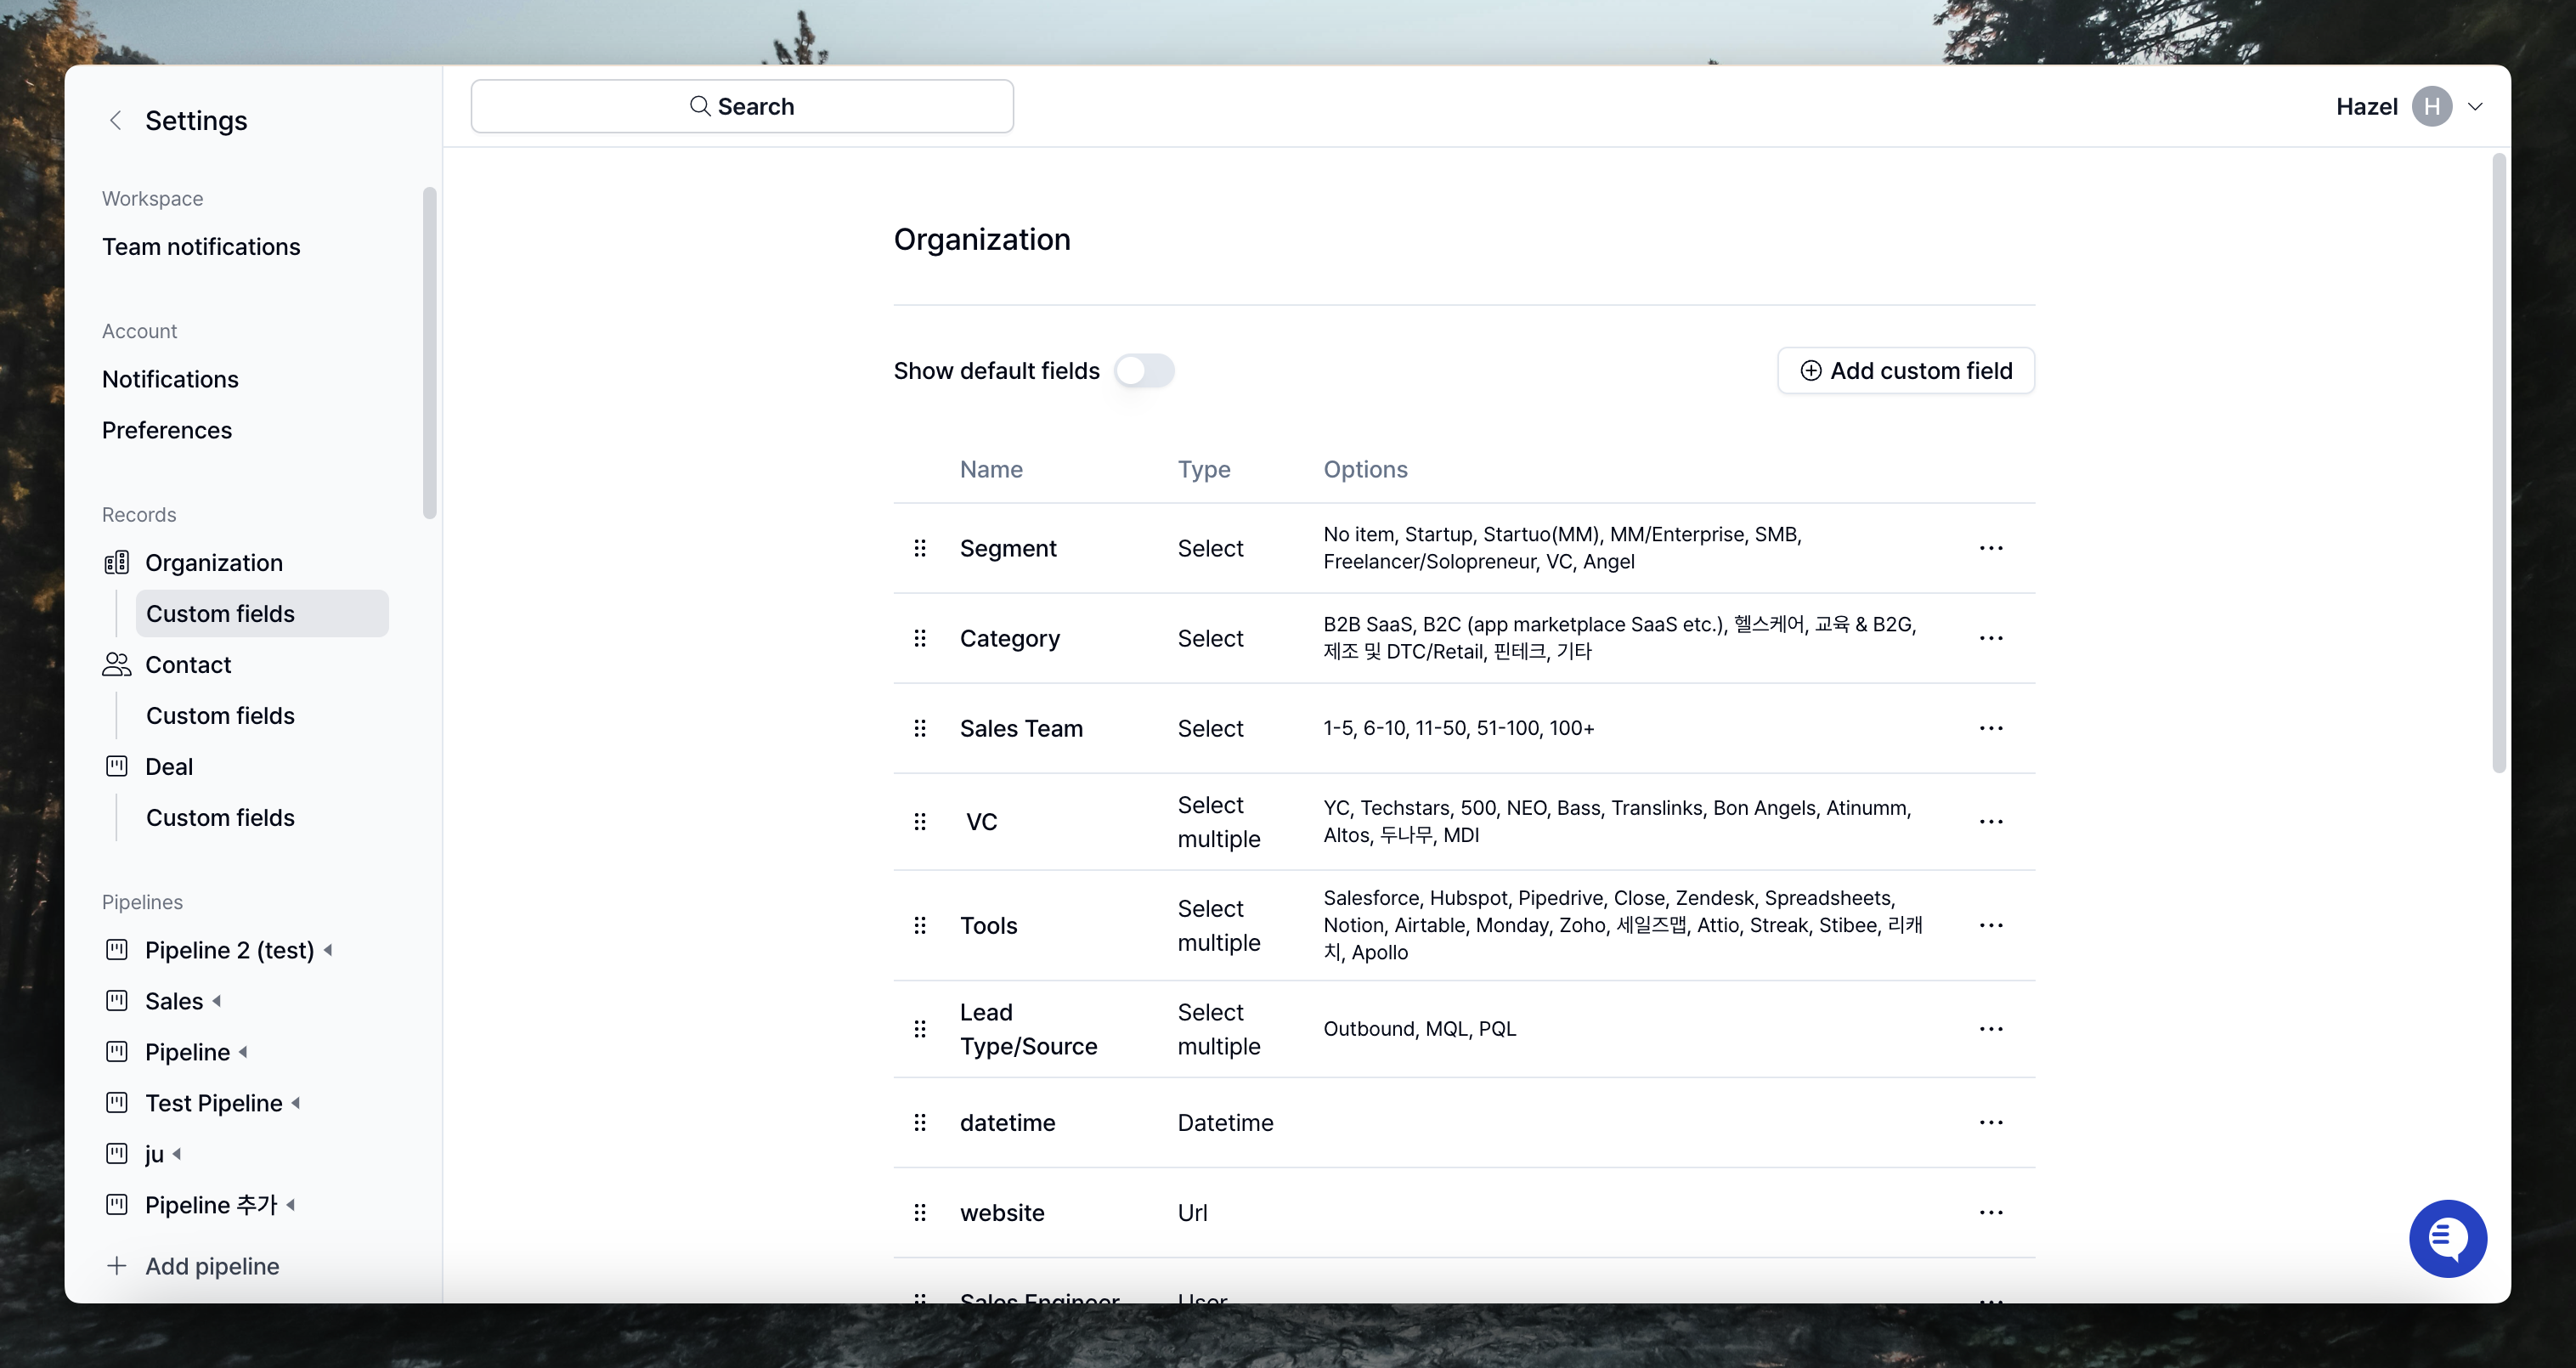
3. Set up your custom fields
How to import
Go to the Admin page, select Import from the left menu bar, and then click type of Import (Organizations, Lists and Processes) you want to import.
- Import Organizations: This is mainly used when you register an Organization and a Contact together (Organization name required)
- Import Lists: This is mainly used when you want to register Contacts as a list. However, you need to create the contact list you want to import in Relate beforehand. (Organization name not required)
Step 1. Create a .CSV file
You can download a sample .CSV file with default fields viaDownload example and use it to prepare your file for import.
If you already have a .CSV file ready to import, you can proceed directly to Step 2.
Creating a file to co-create Contacts with Import Organizations
Here’s how to import Organizations and also import Contacts that belong to those organizations.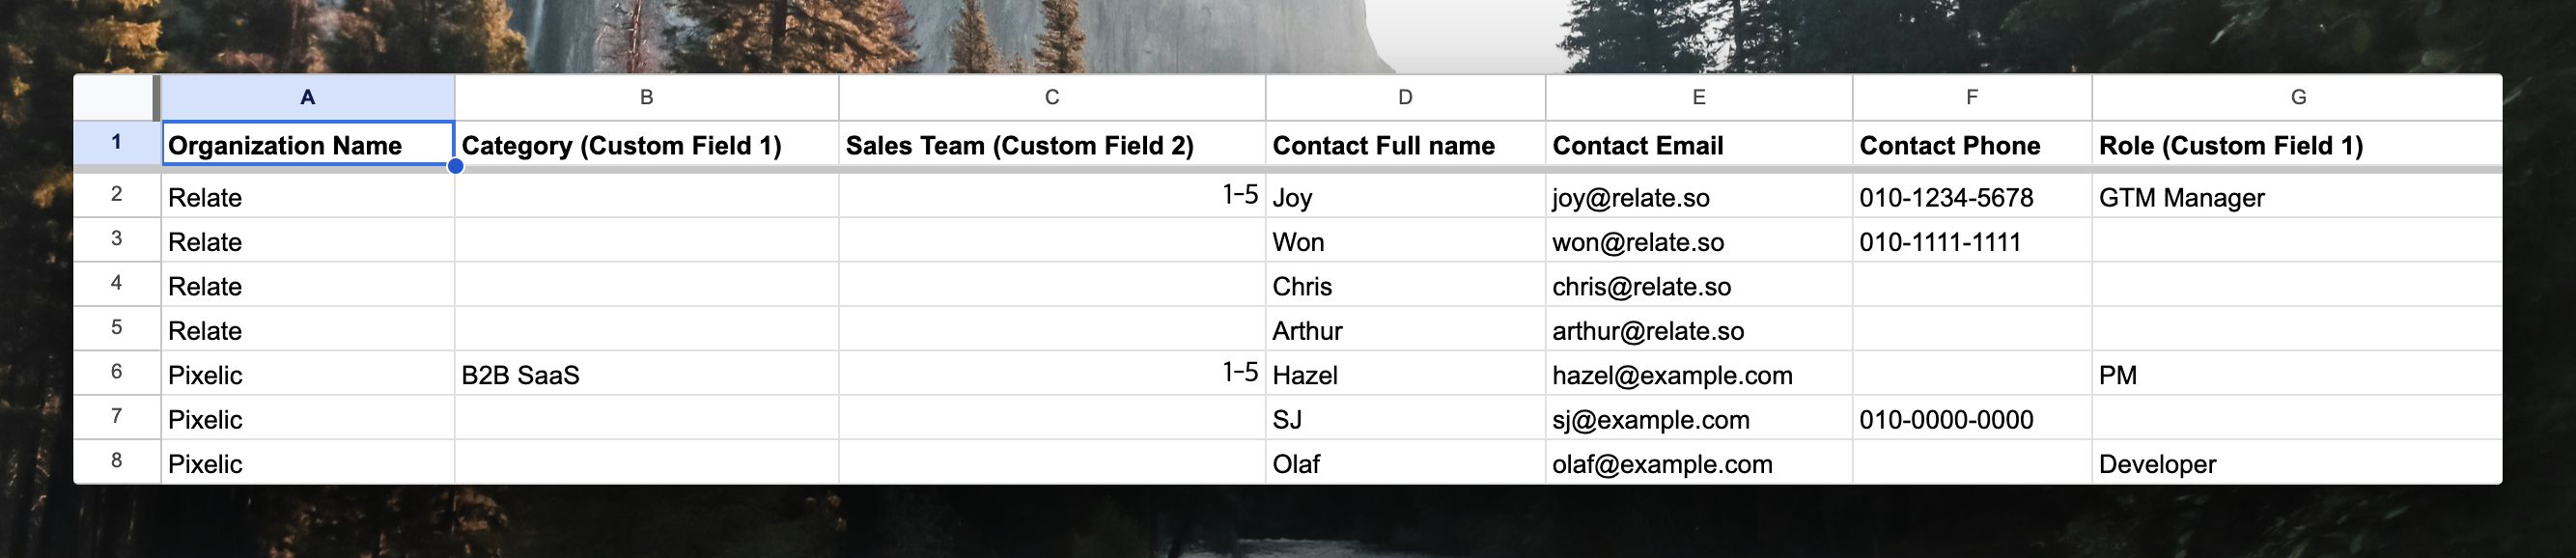
- First, create a header with the data fields you want to include in the Organization.
- Also, fill in the fields for Contact that you want to include, which must be either name or email.
- Enter all of the information for the Organization and the information for the Contact that you want to include in the first line, excluding the header.
- Next, for the Contact that will be in that organization, complete only the Organization name and then fill in the Contact information.
- Continue to create Organization name-Contact, and repeat steps 2-3 if you want to add another Organization and the Contacts that belong to it. (See line 6 in the photo.)
Step 2. Upload file
Drag and drop a .CSV file or click to choose a file from your local computer.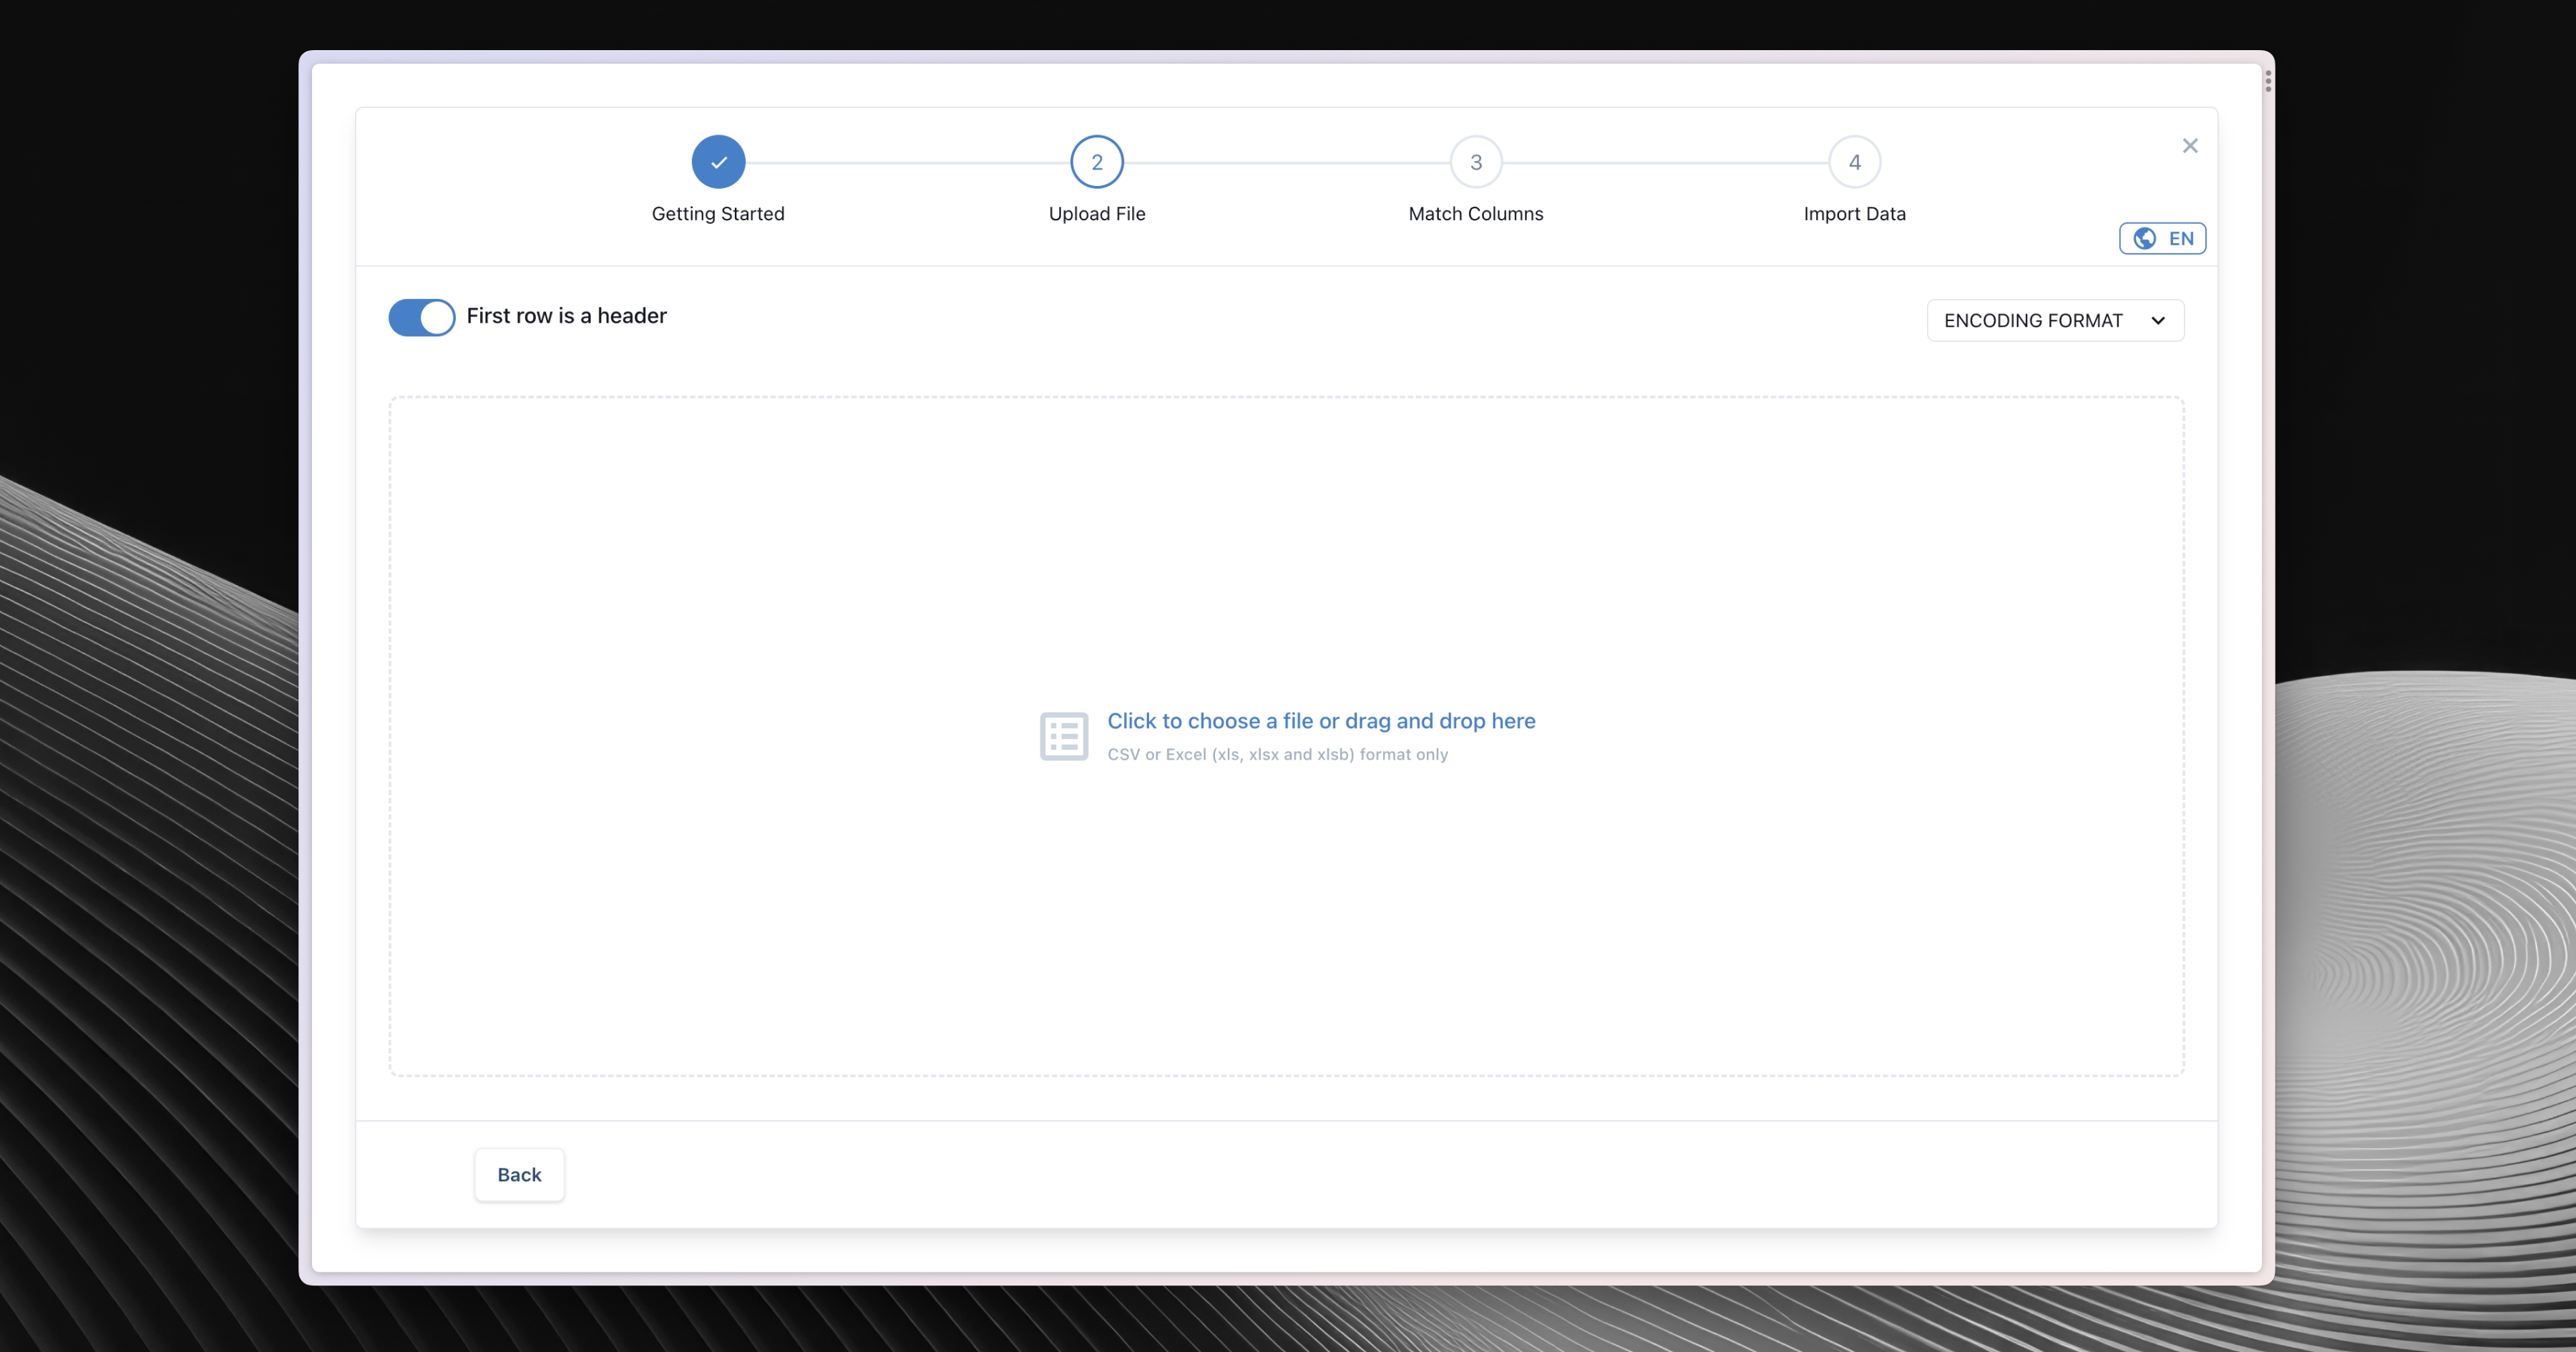
Next Step at the bottom right corner to proceed.
Note that by default, first row is a header. If you want to treat the first row as data value, turn this mode off by switching the top left toggle button.
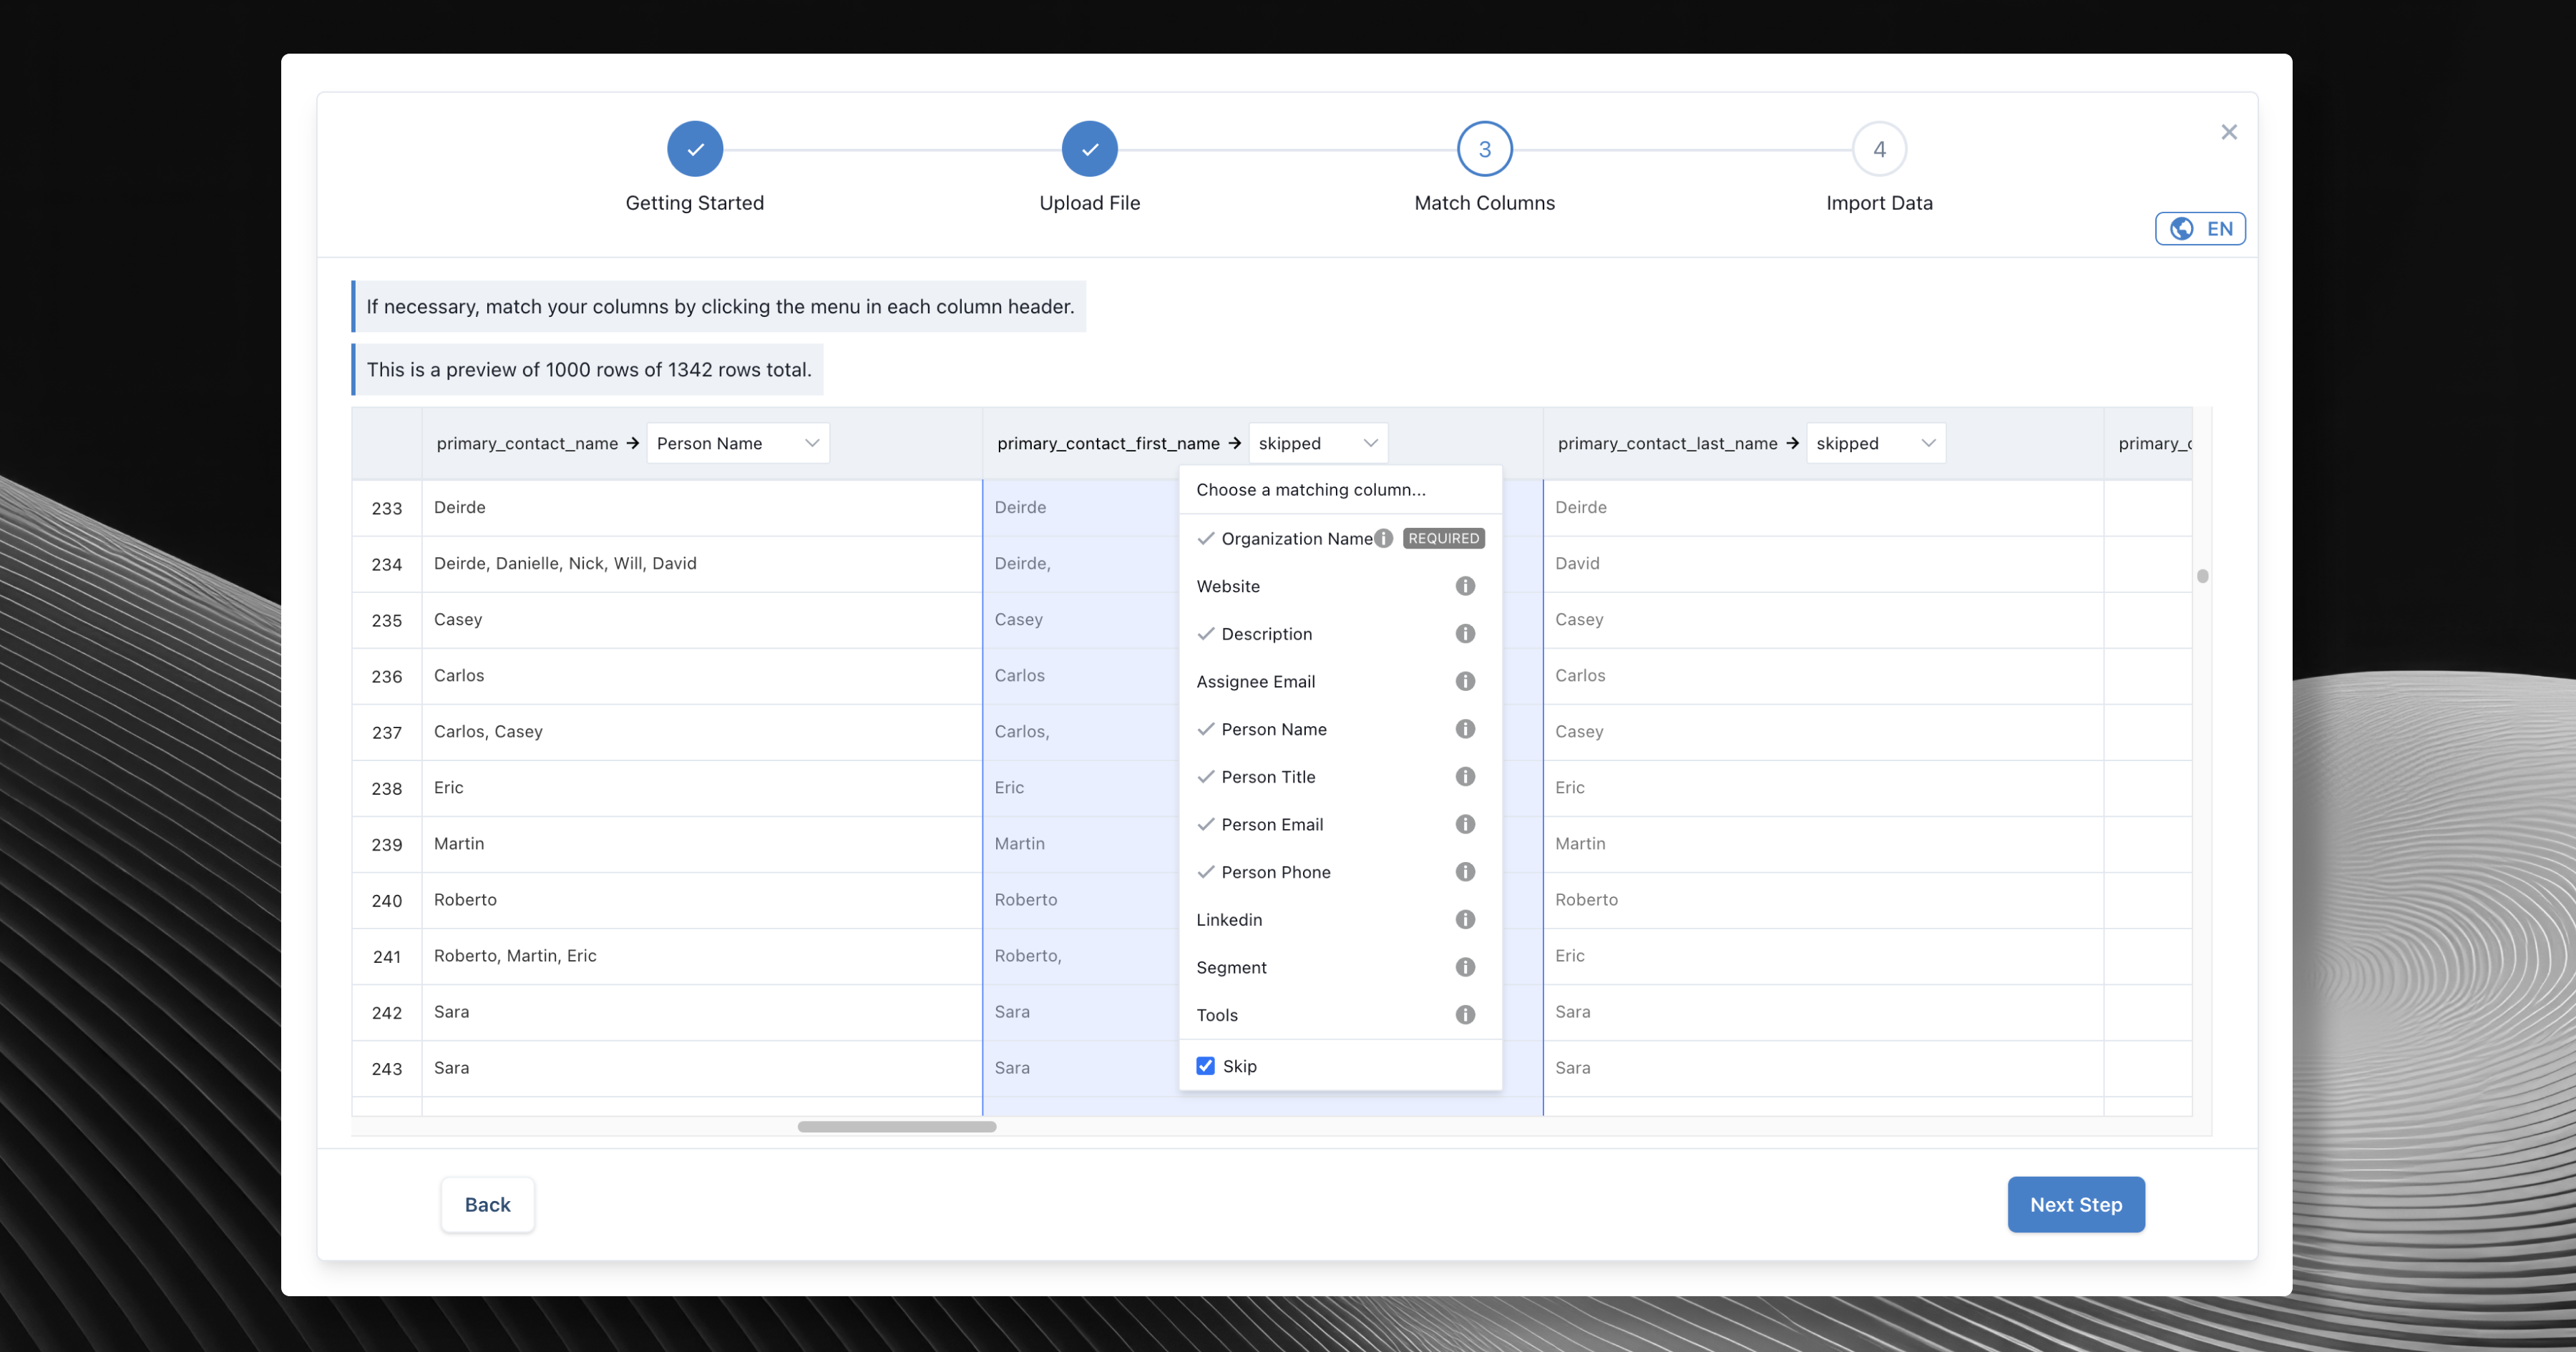
Step 3. Match columns
In this step, you can match the columns in your .CSV file with the data fields in Relate.Smart fuzzy matching
Input CSV file and destination columns are automatically mapped using smart fuzzy text matching.Fix validation issues seamlessly
If any fields need fixing, you can edit them as if you’re editing a spreadsheet directly from the import page. No need to go back to your local Excel file. If anything goes wrong during this process, error will be displayed in red.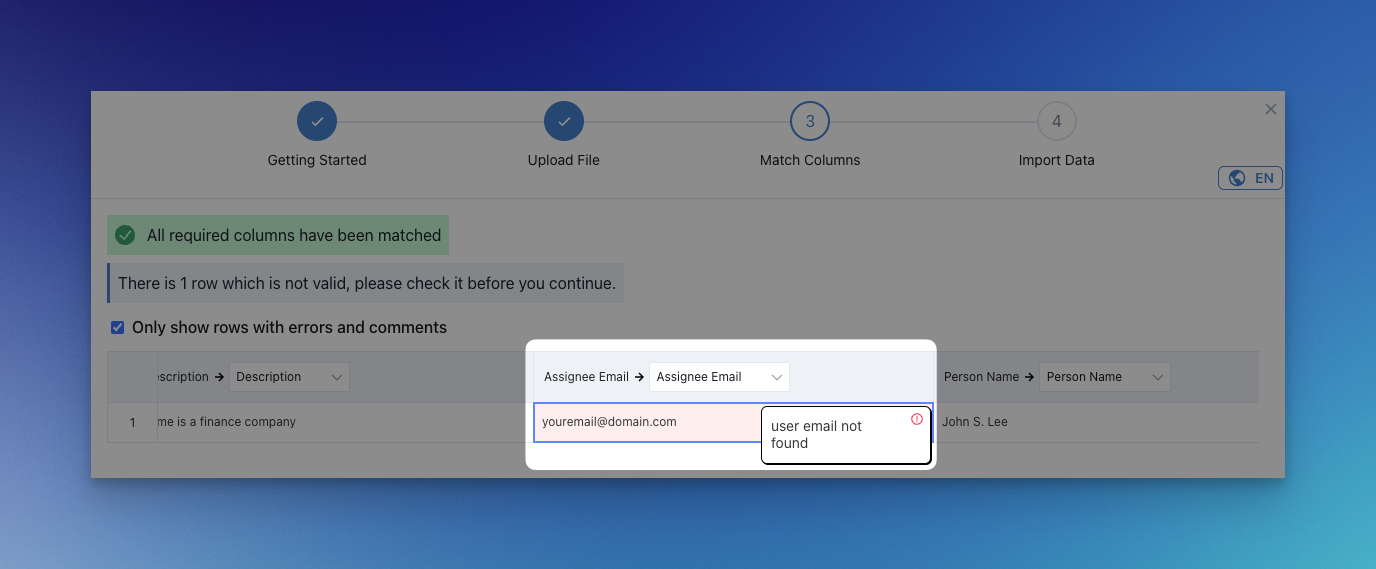
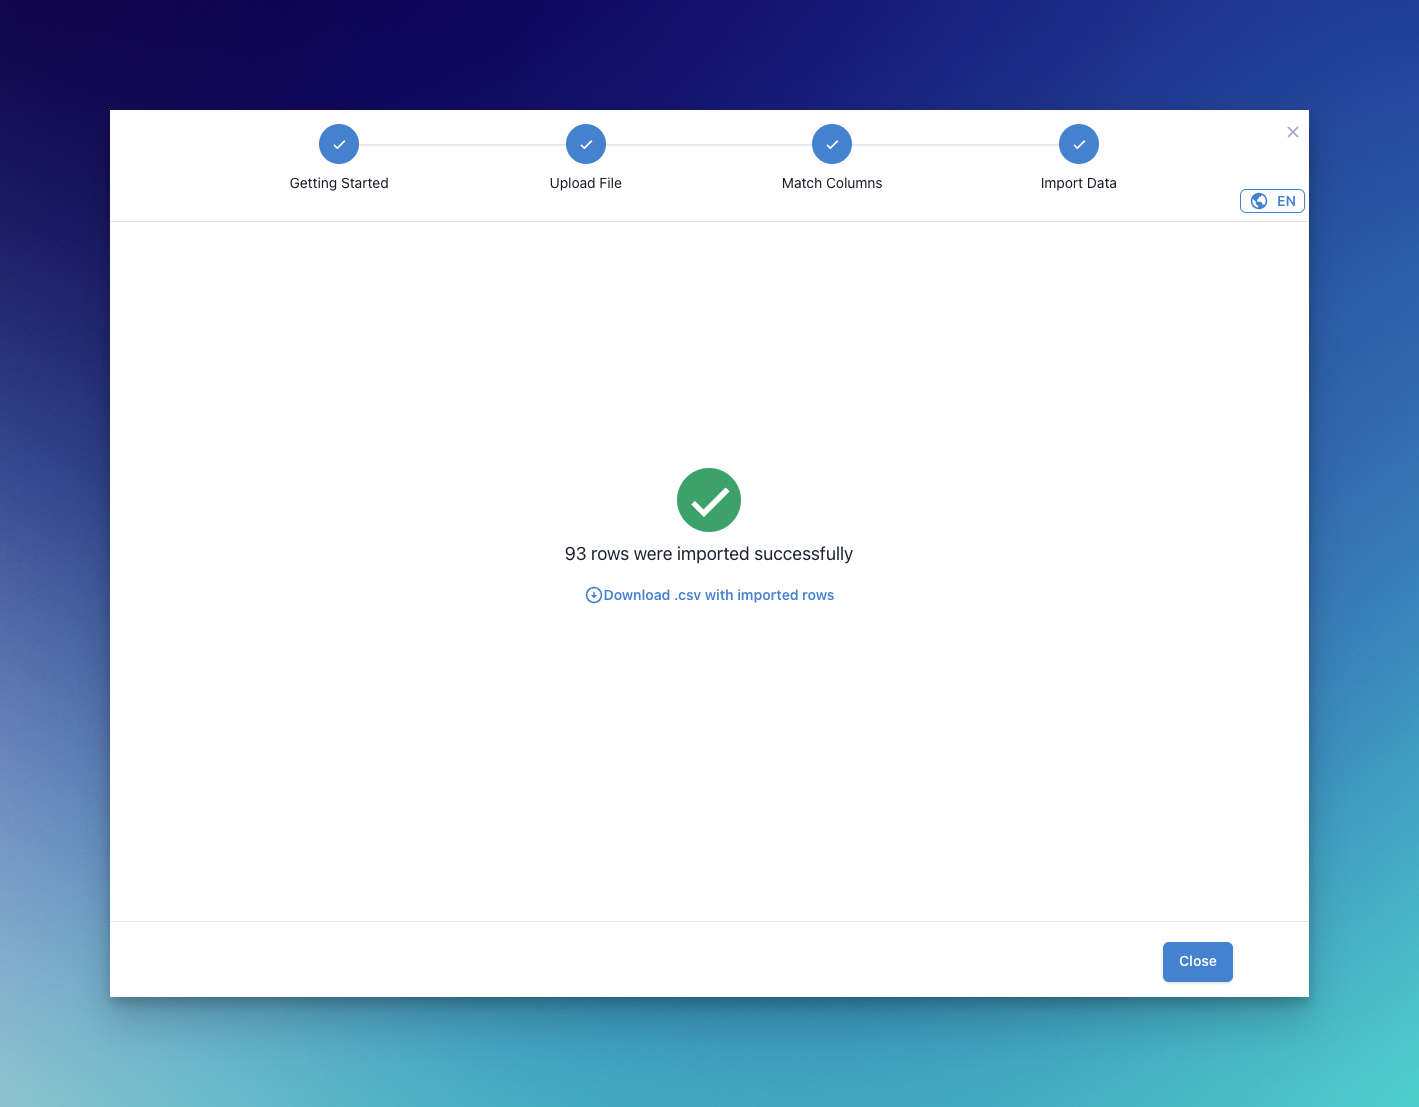
Step 4: Import data
Once you click theImport Data button you should see a confirmation. Confirm the import and you should be able to see the screen below.
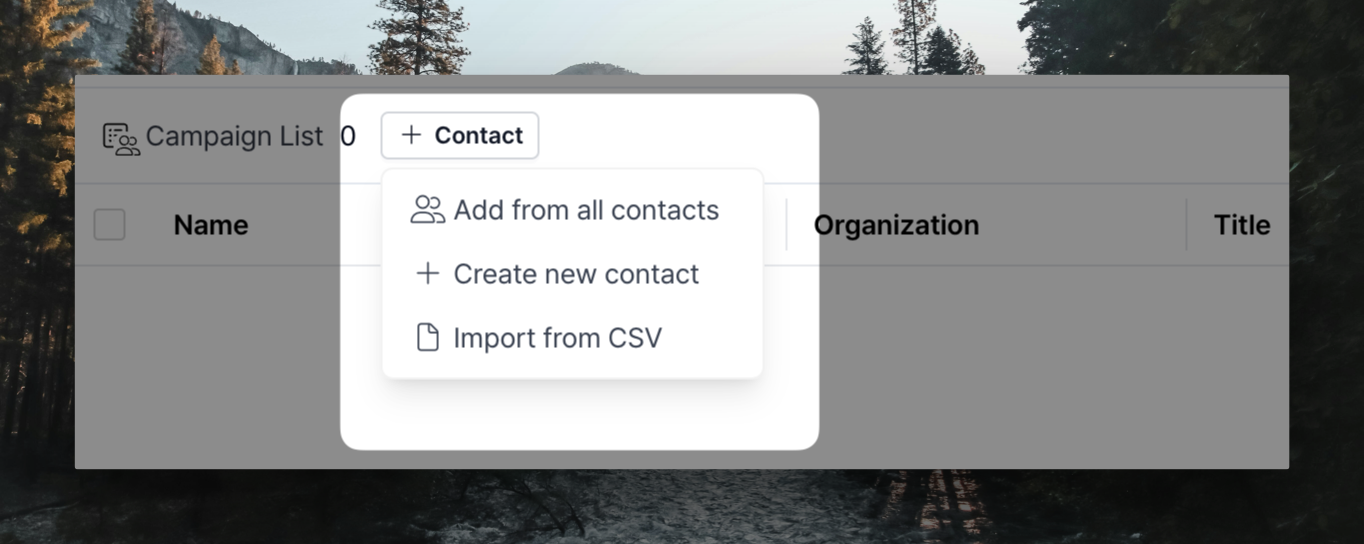
Import Lists
Frequently Asked Questions
CSV file is broken when importing. How can I fix it?
CSV file is broken when importing. How can I fix it?
You can open the file, save it as XLSX instead of CSV, and reimport it as follows.
-
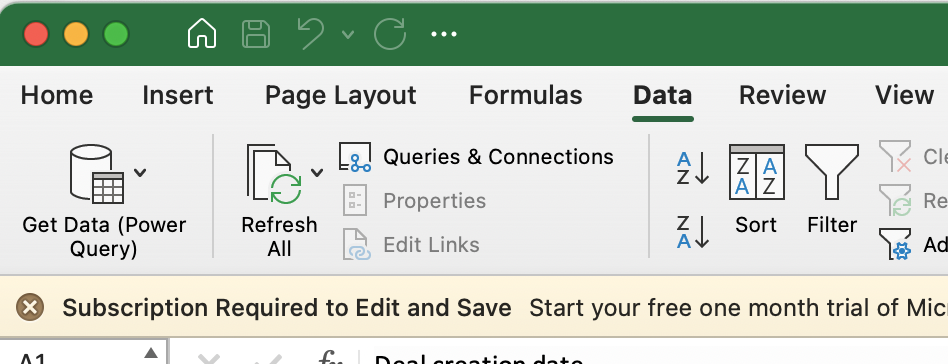
In Microsoft Excel, on the Data tab, click Get Data (Power Query)
-
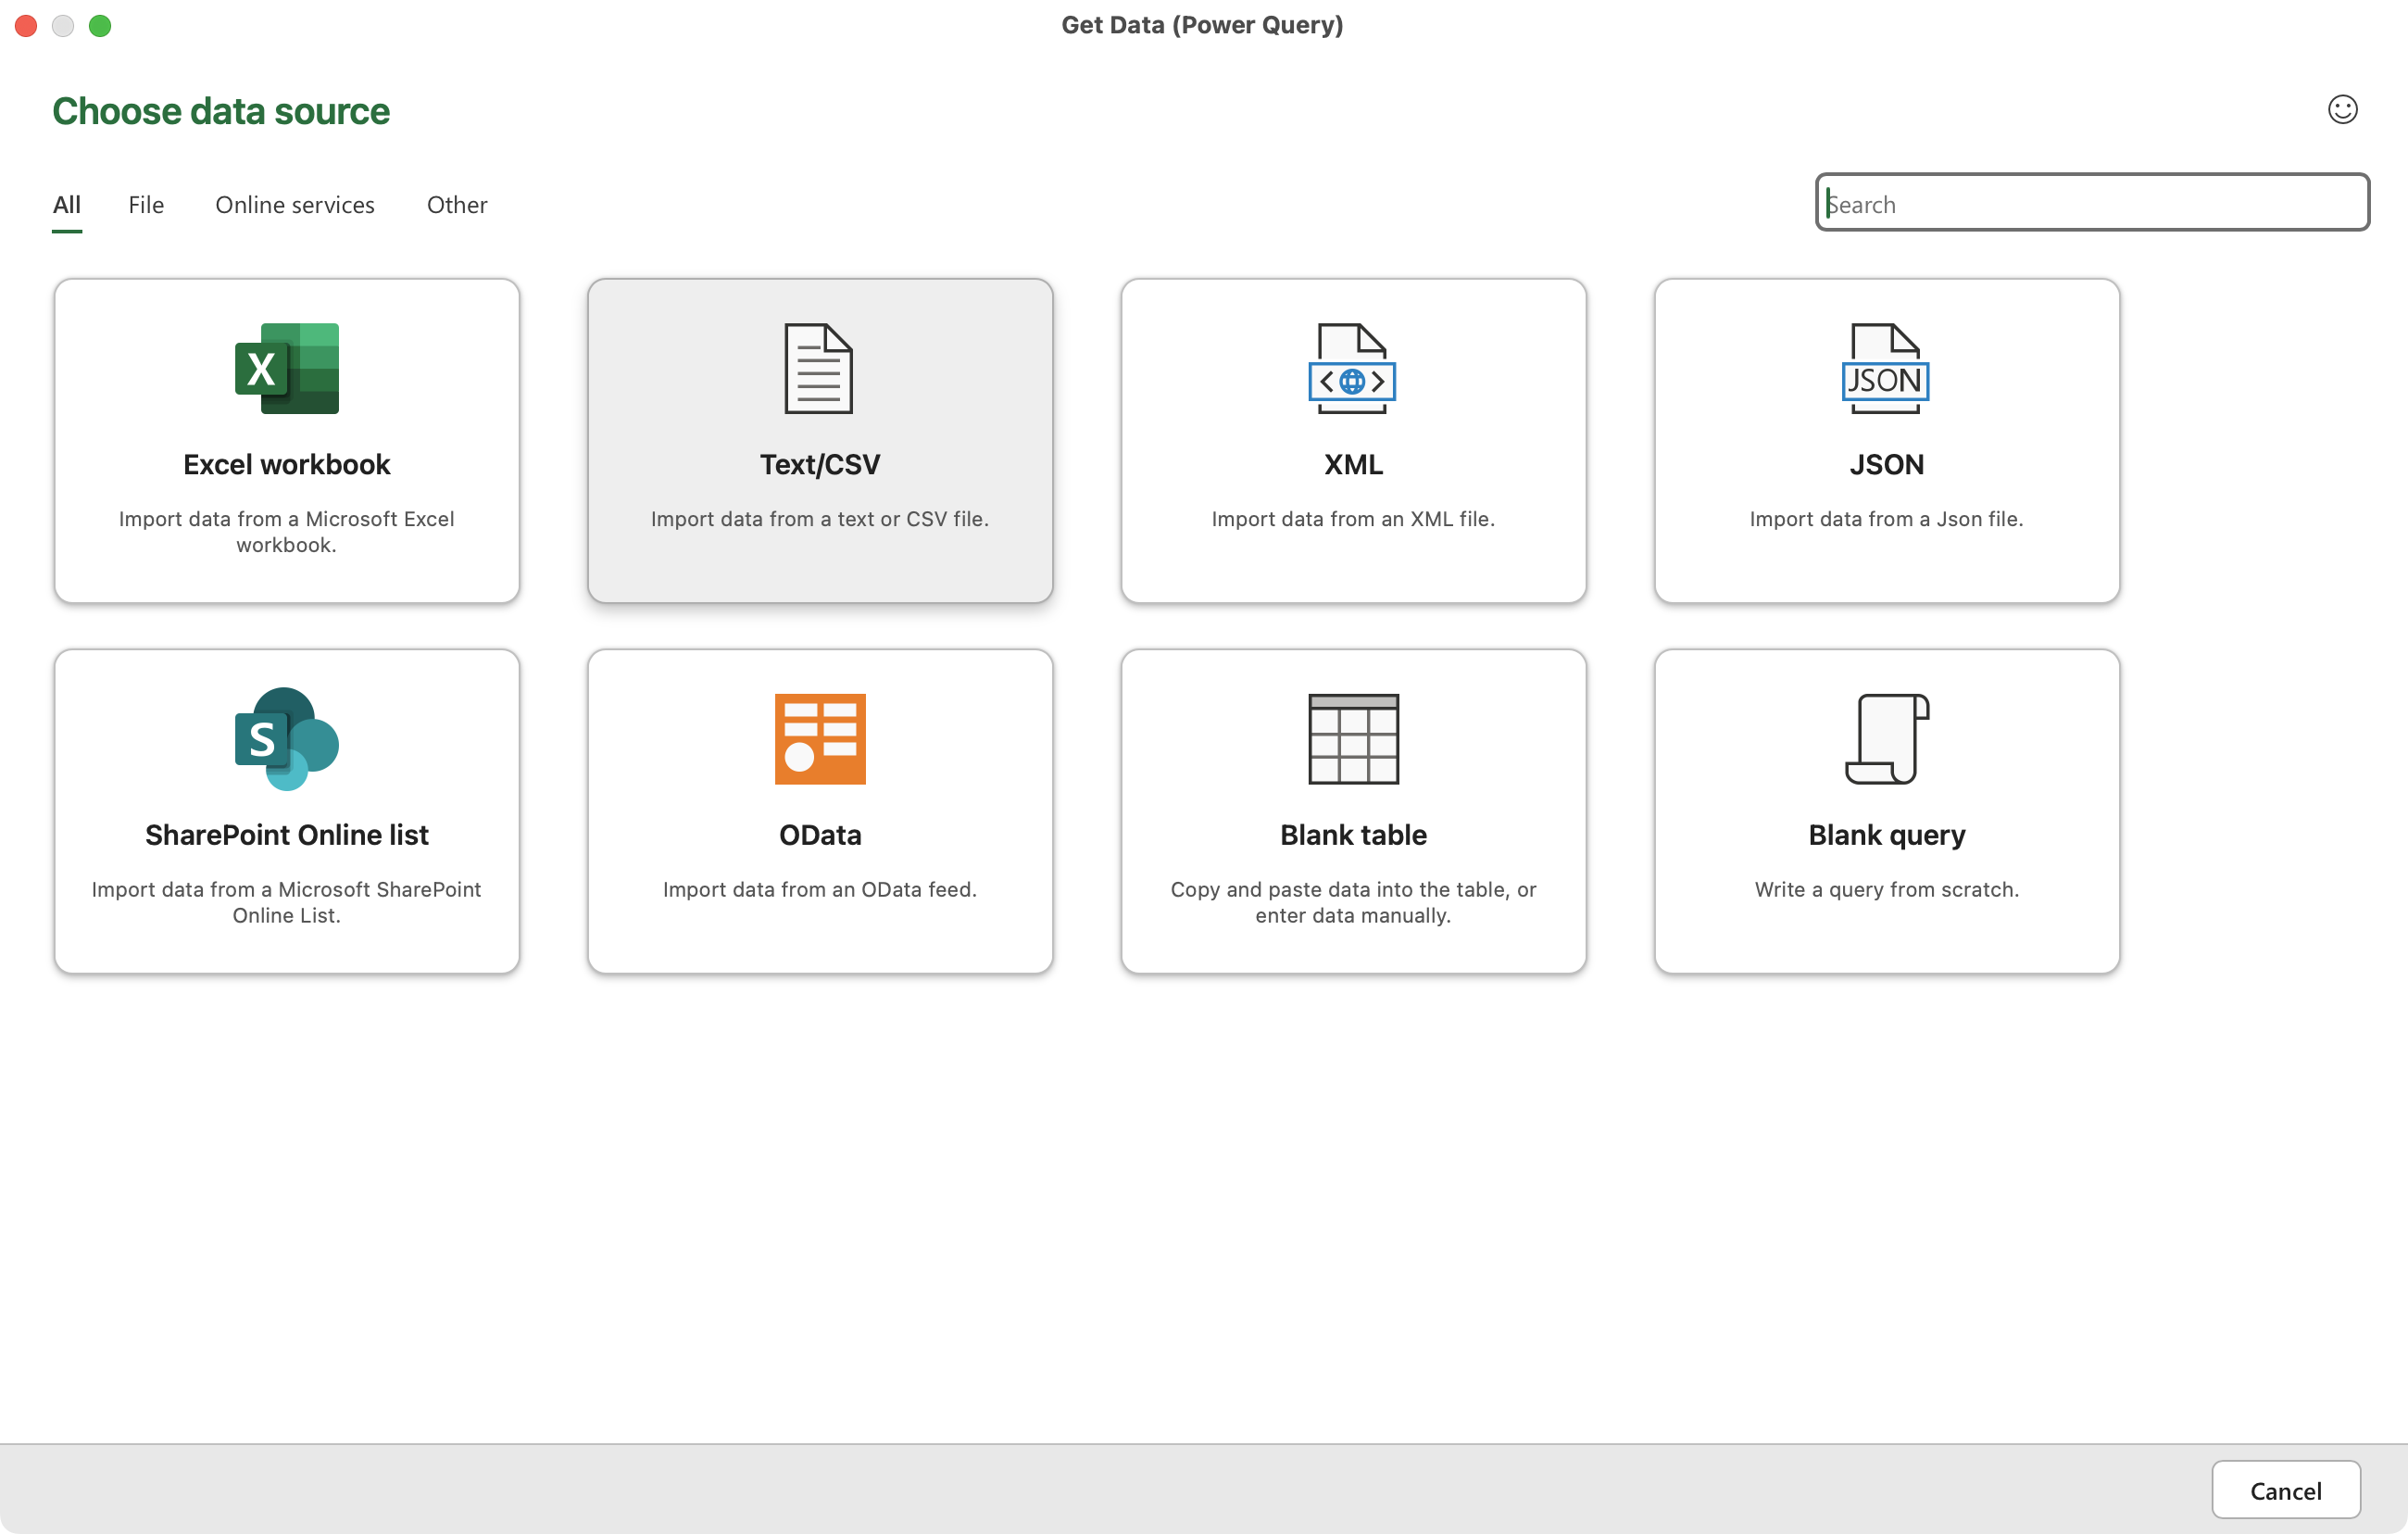
click Text/CSV and select the file with the broken Korean characters
-
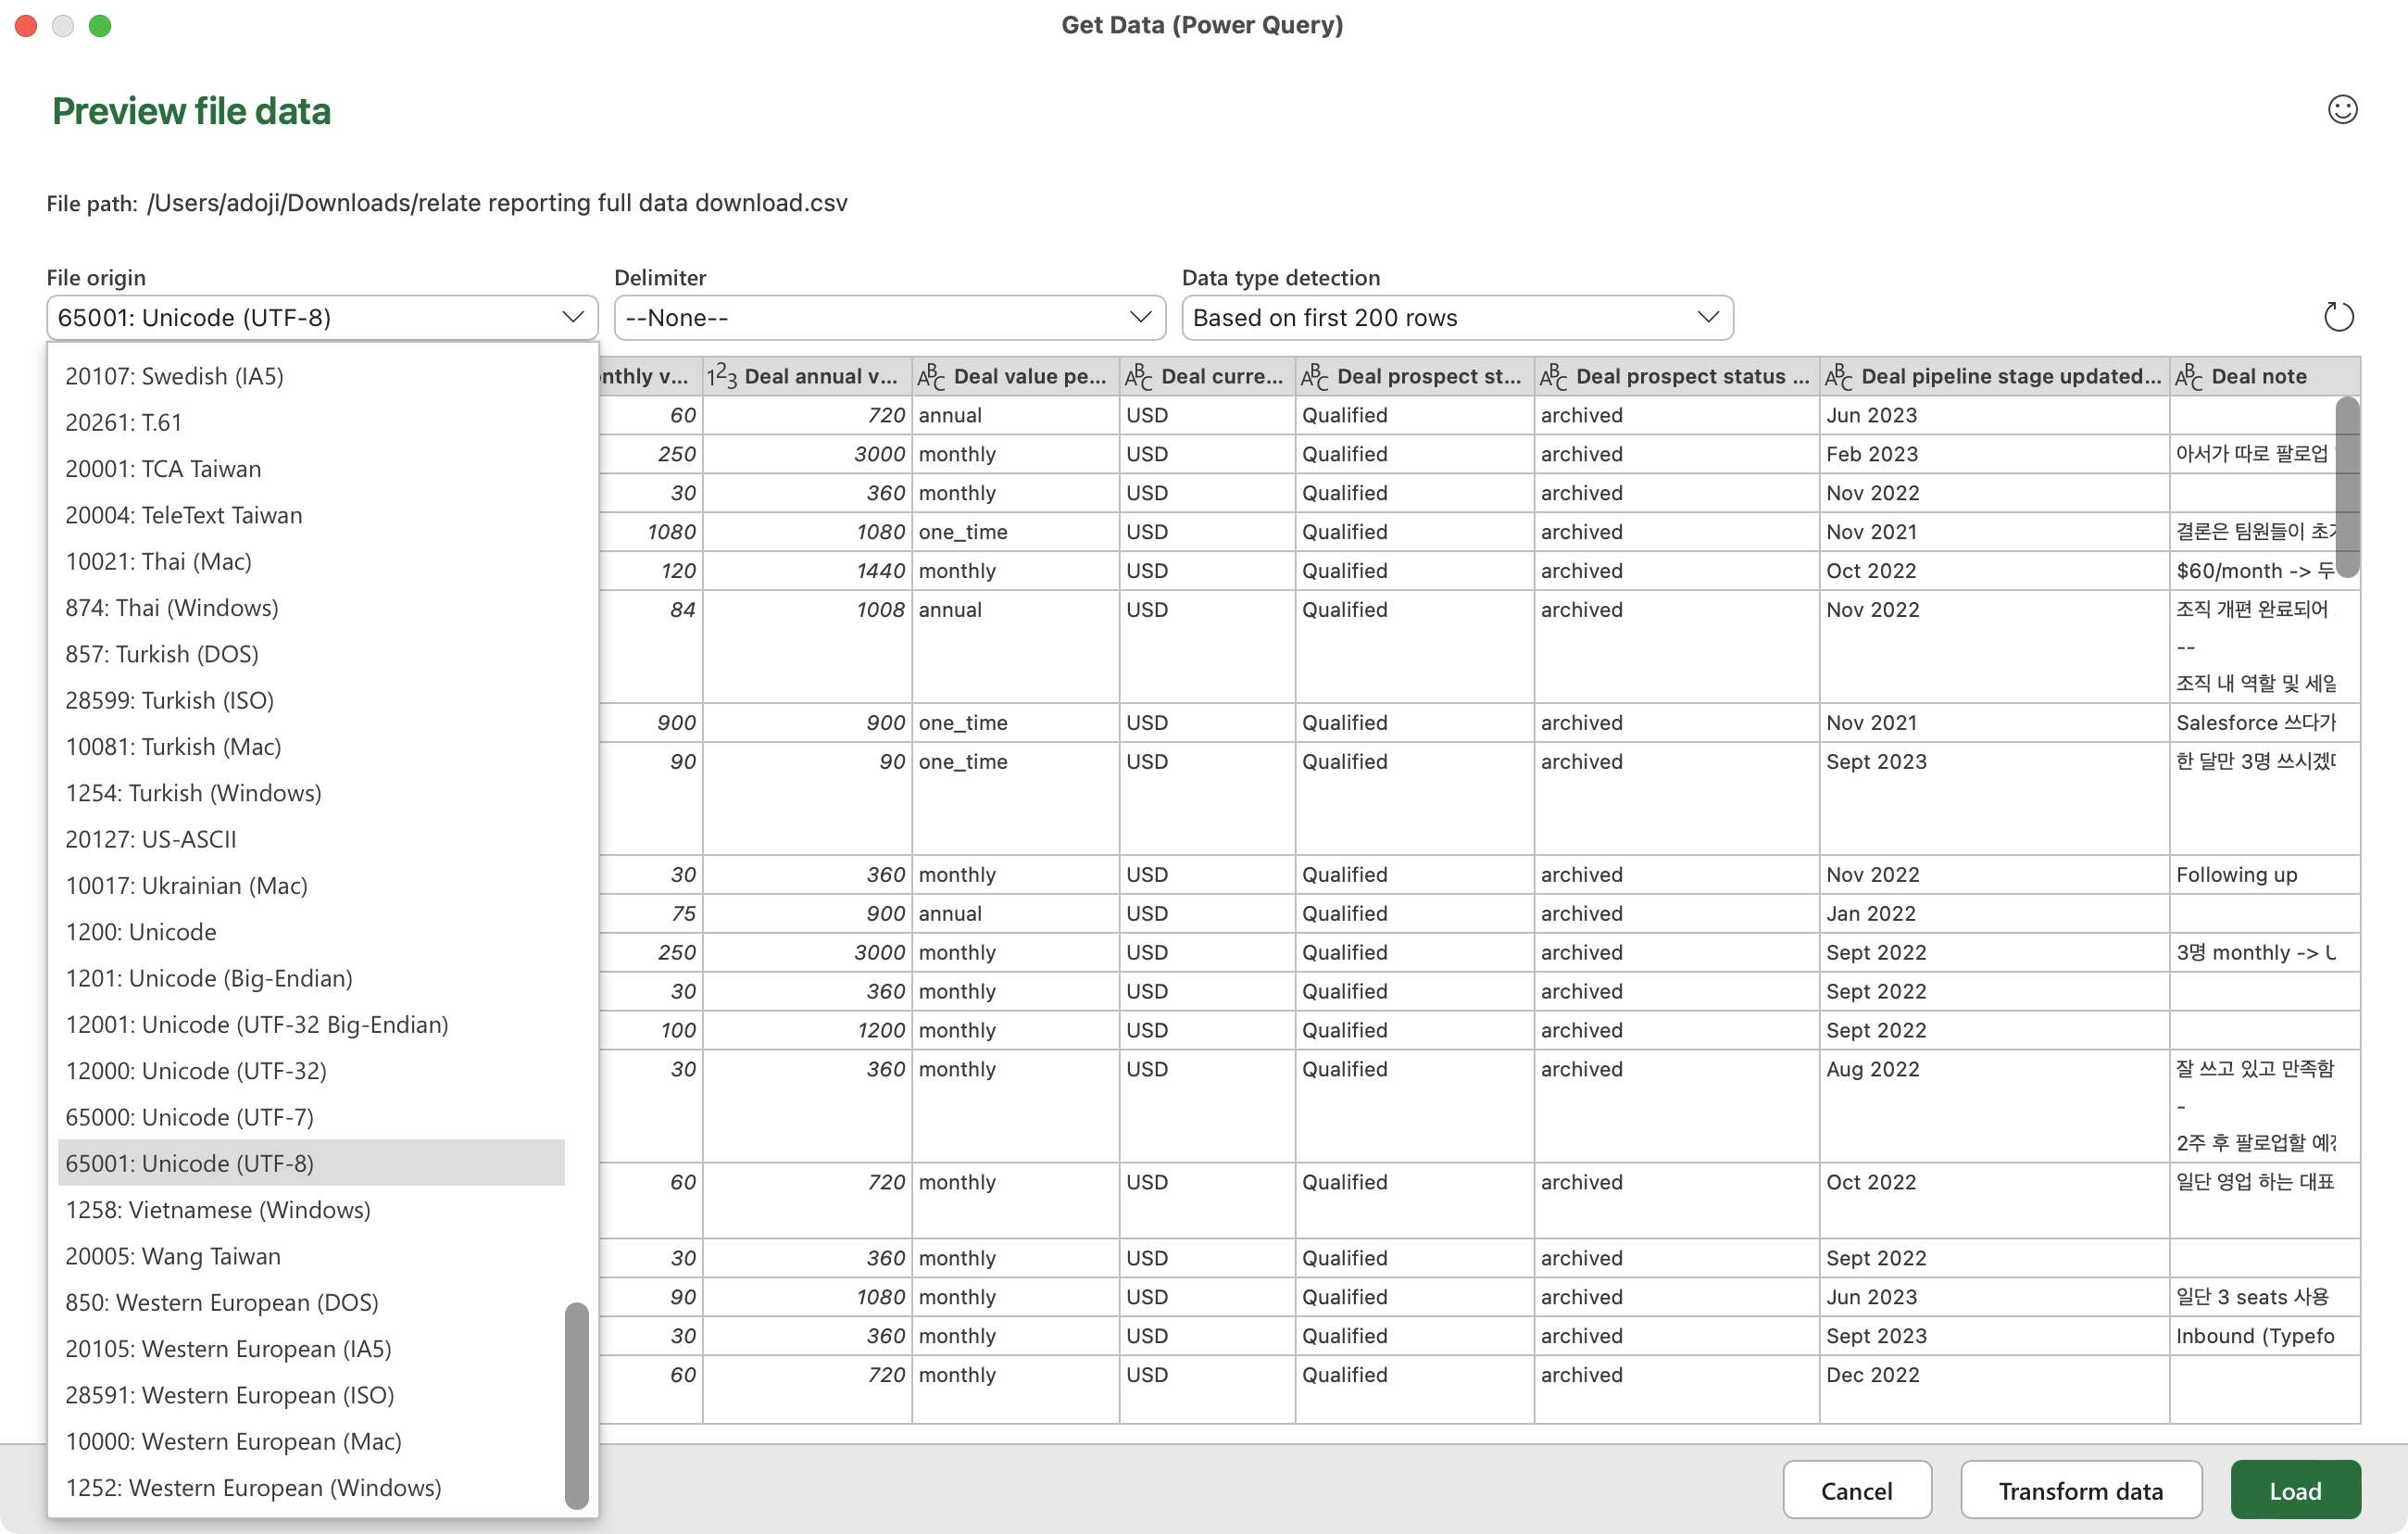
select UTF8 and click Load
I'd like to know why my import failed. How can I find out?
I'd like to know why my import failed. How can I find out?
When an import fails, you can see the following message: Download .csv with rows that were not imported.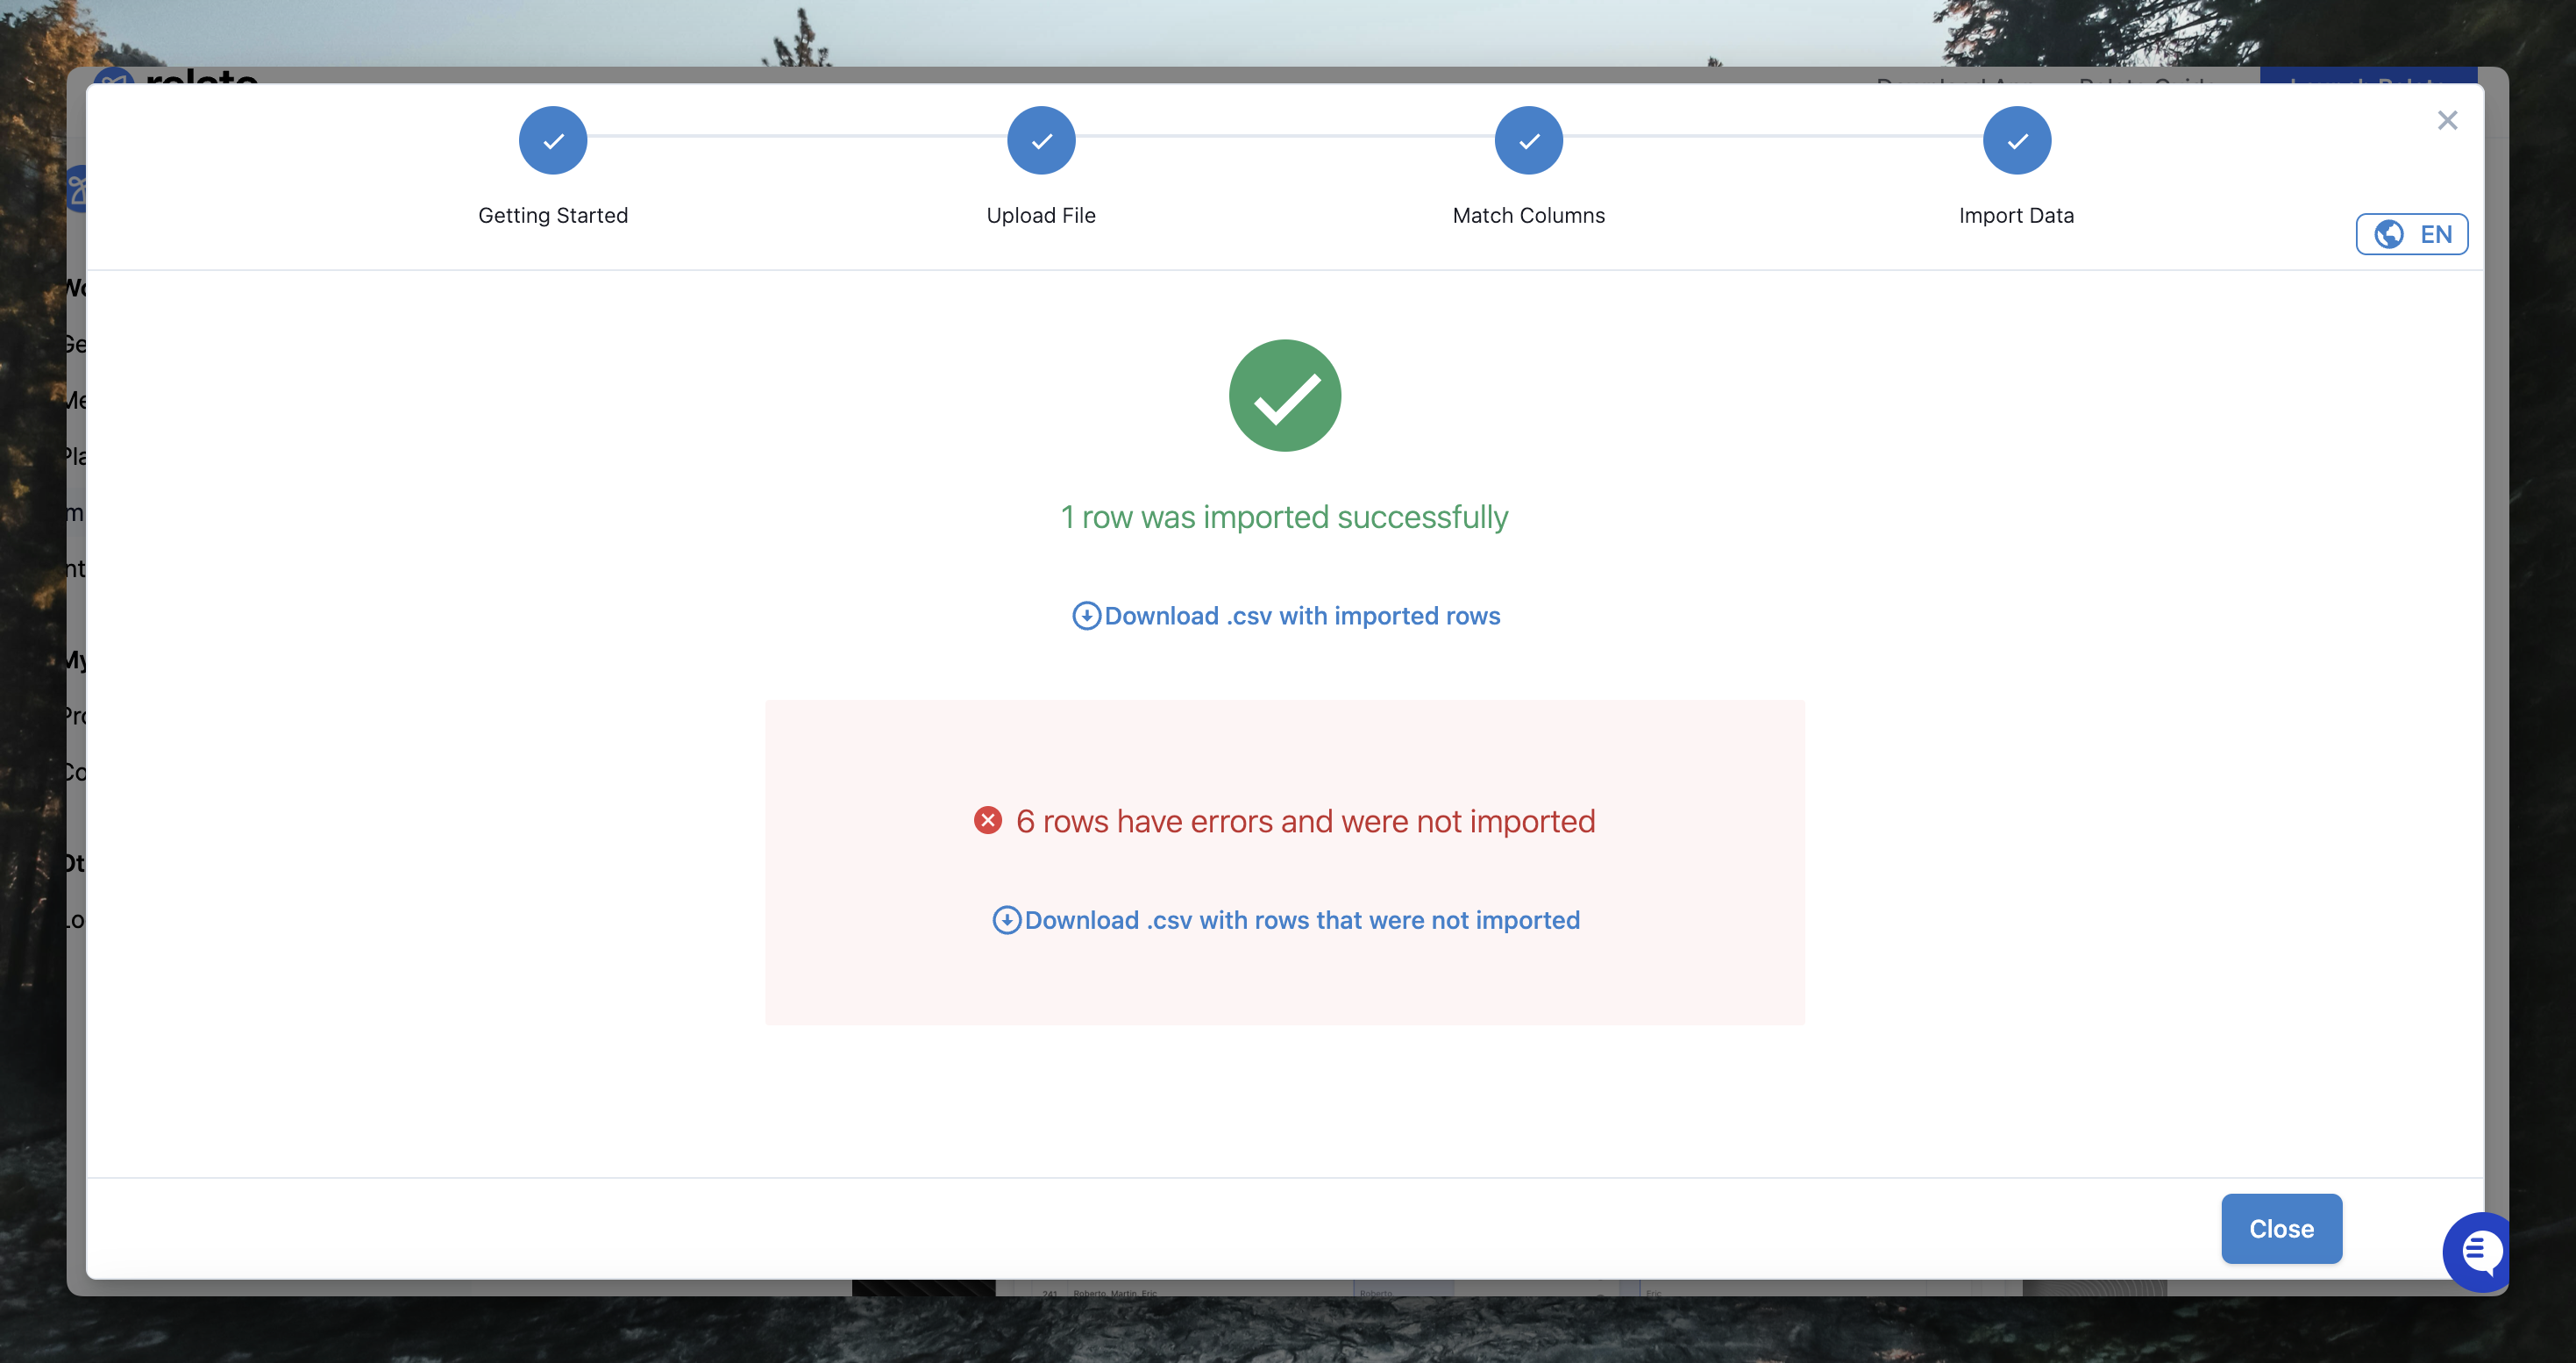
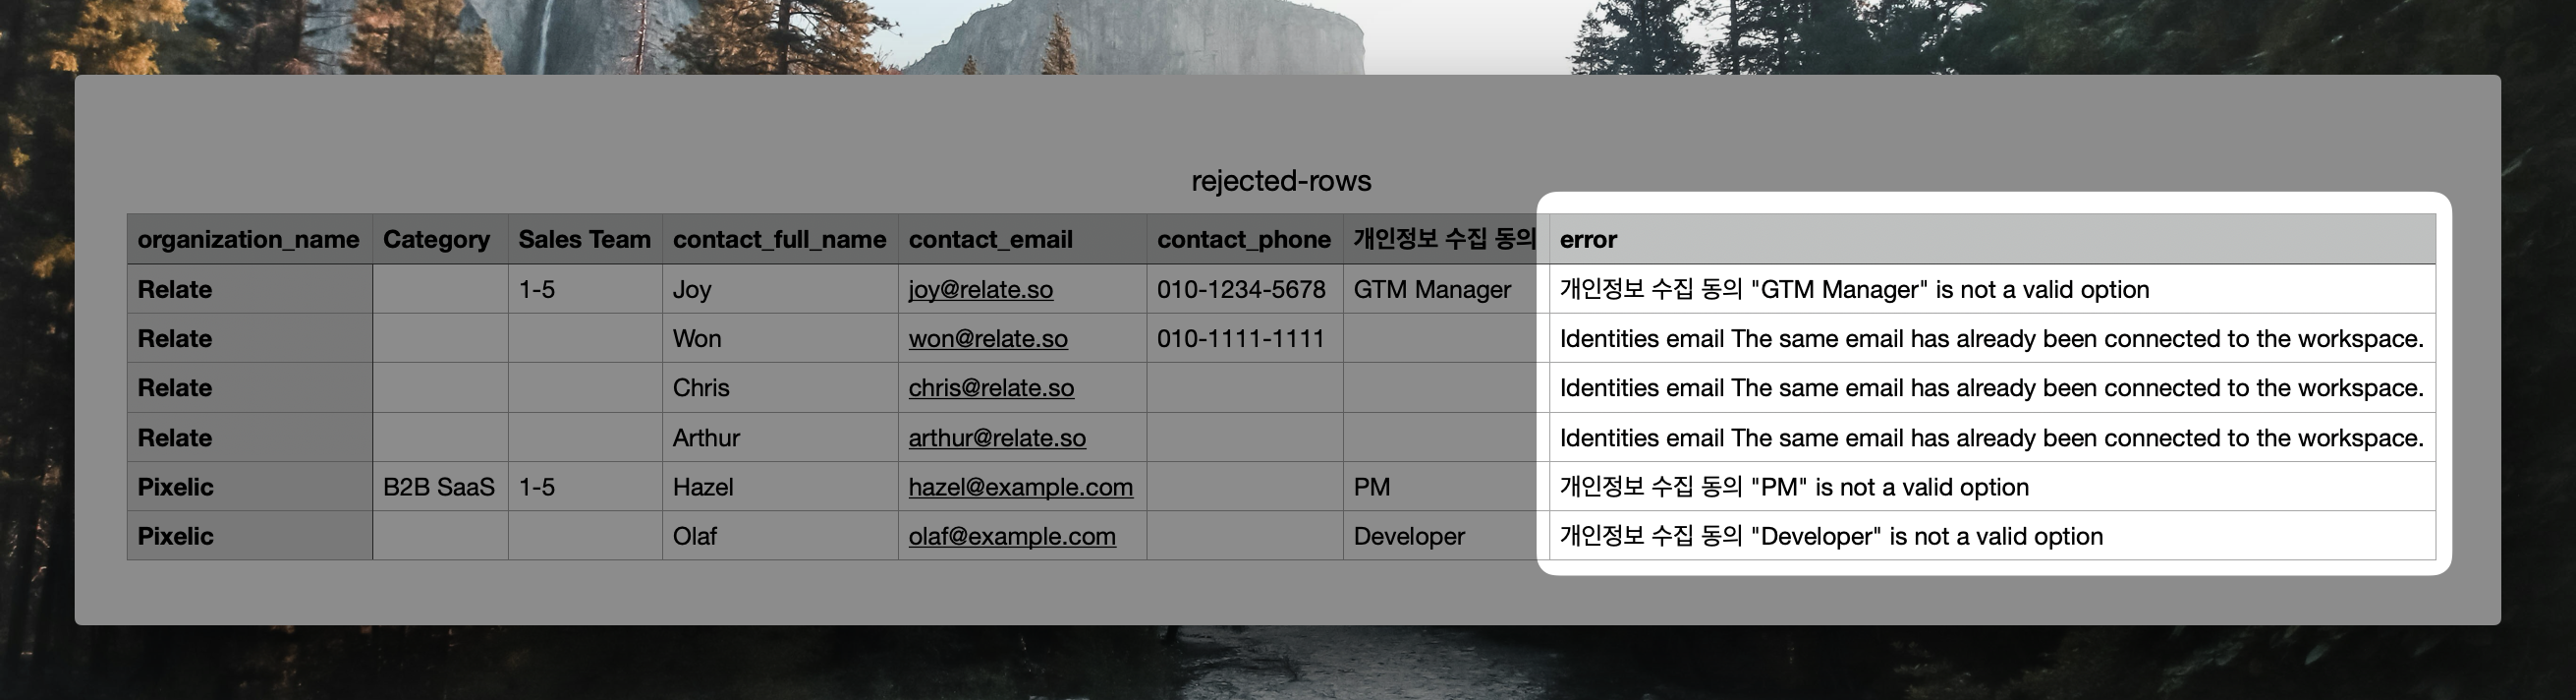
Why do imports usually fail and how can I fix them?
Why do imports usually fail and how can I fix them?
There are two main reasons why imports fail.First, duplicate fields with unique values. In Relate, Organization name, Contact email, and Domain cannot have duplicate values in any case.For example, if two different organizations, Relate (@example.so) and Pixelic (@example.so), have the same domain, the import will fail due to a duplicate import violation.
This is especially true for domains, which are automatically generated based on emails without you having to enter them.Second, if you imported an invalid email - for example, if the email contains special characters other than @, or is from an invalid email account.