> ## Documentation Index
> Fetch the complete documentation index at: https://relate.so/docs/llms.txt
> Use this file to discover all available pages before exploring further.
# DNS Records Setup Guide
> Learn how to set up essential domain records before sending emails through Relate Marketing's email campaigns.
## Overview
Before starting email marketing, you need to set up domain records. This process helps improve sender reputation, email delivery rates, and reduces the chance of emails being marked as spam.
You must first configure the domain records for the domain you'll use to send emails through Relate Campaign.
## Step 1: Access Domain Records Settings
Go to workspace **Settings** (Click the workspace logo in the top left corner of the app and select Settings, or use Cmd + ,).
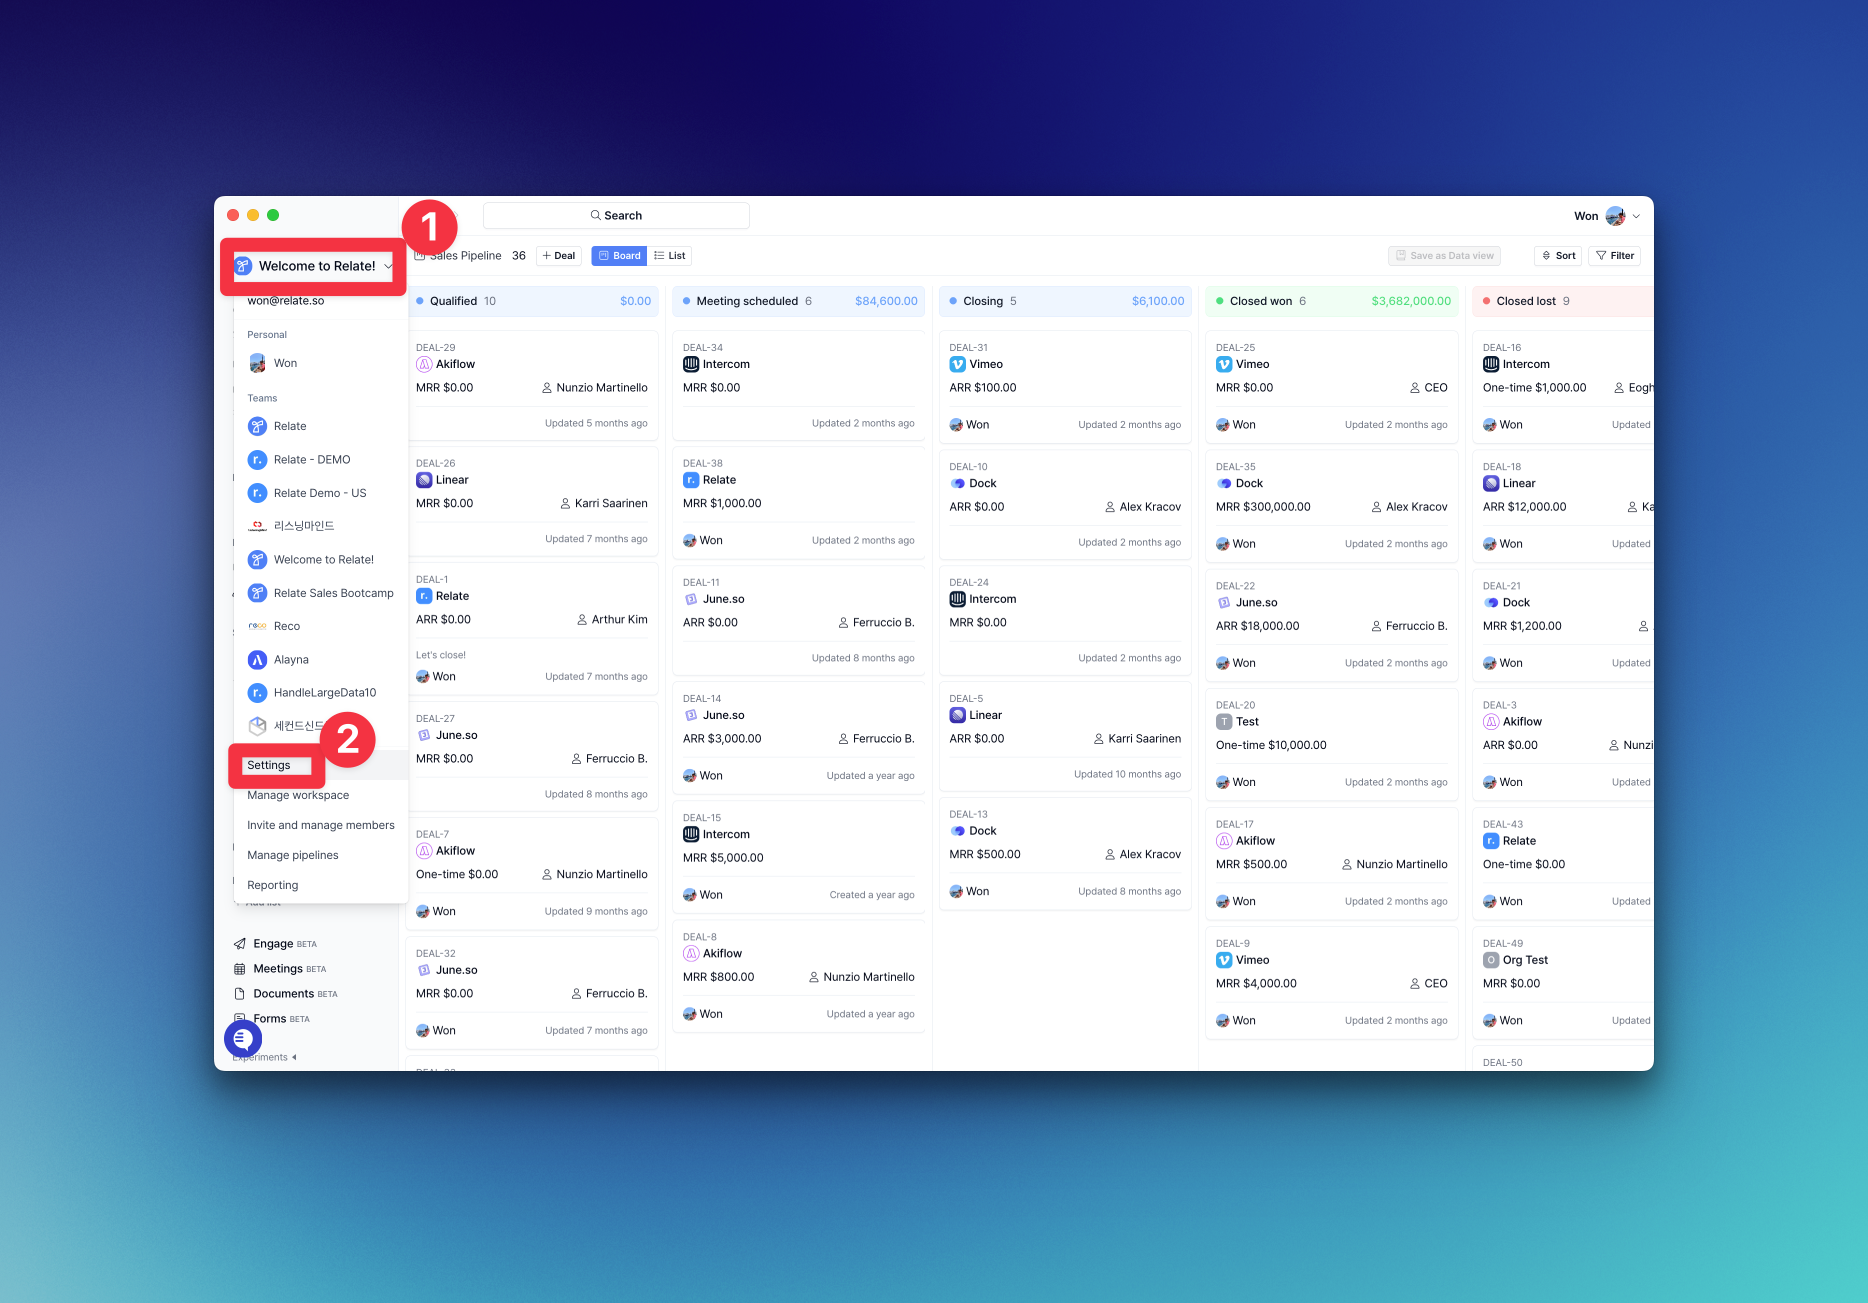 Click **Campaigns** under the **Products** section to access domain record settings.
### What You'll Find on the Domain Records Page
Click **Campaigns** under the **Products** section to access domain record settings.
### What You'll Find on the Domain Records Page
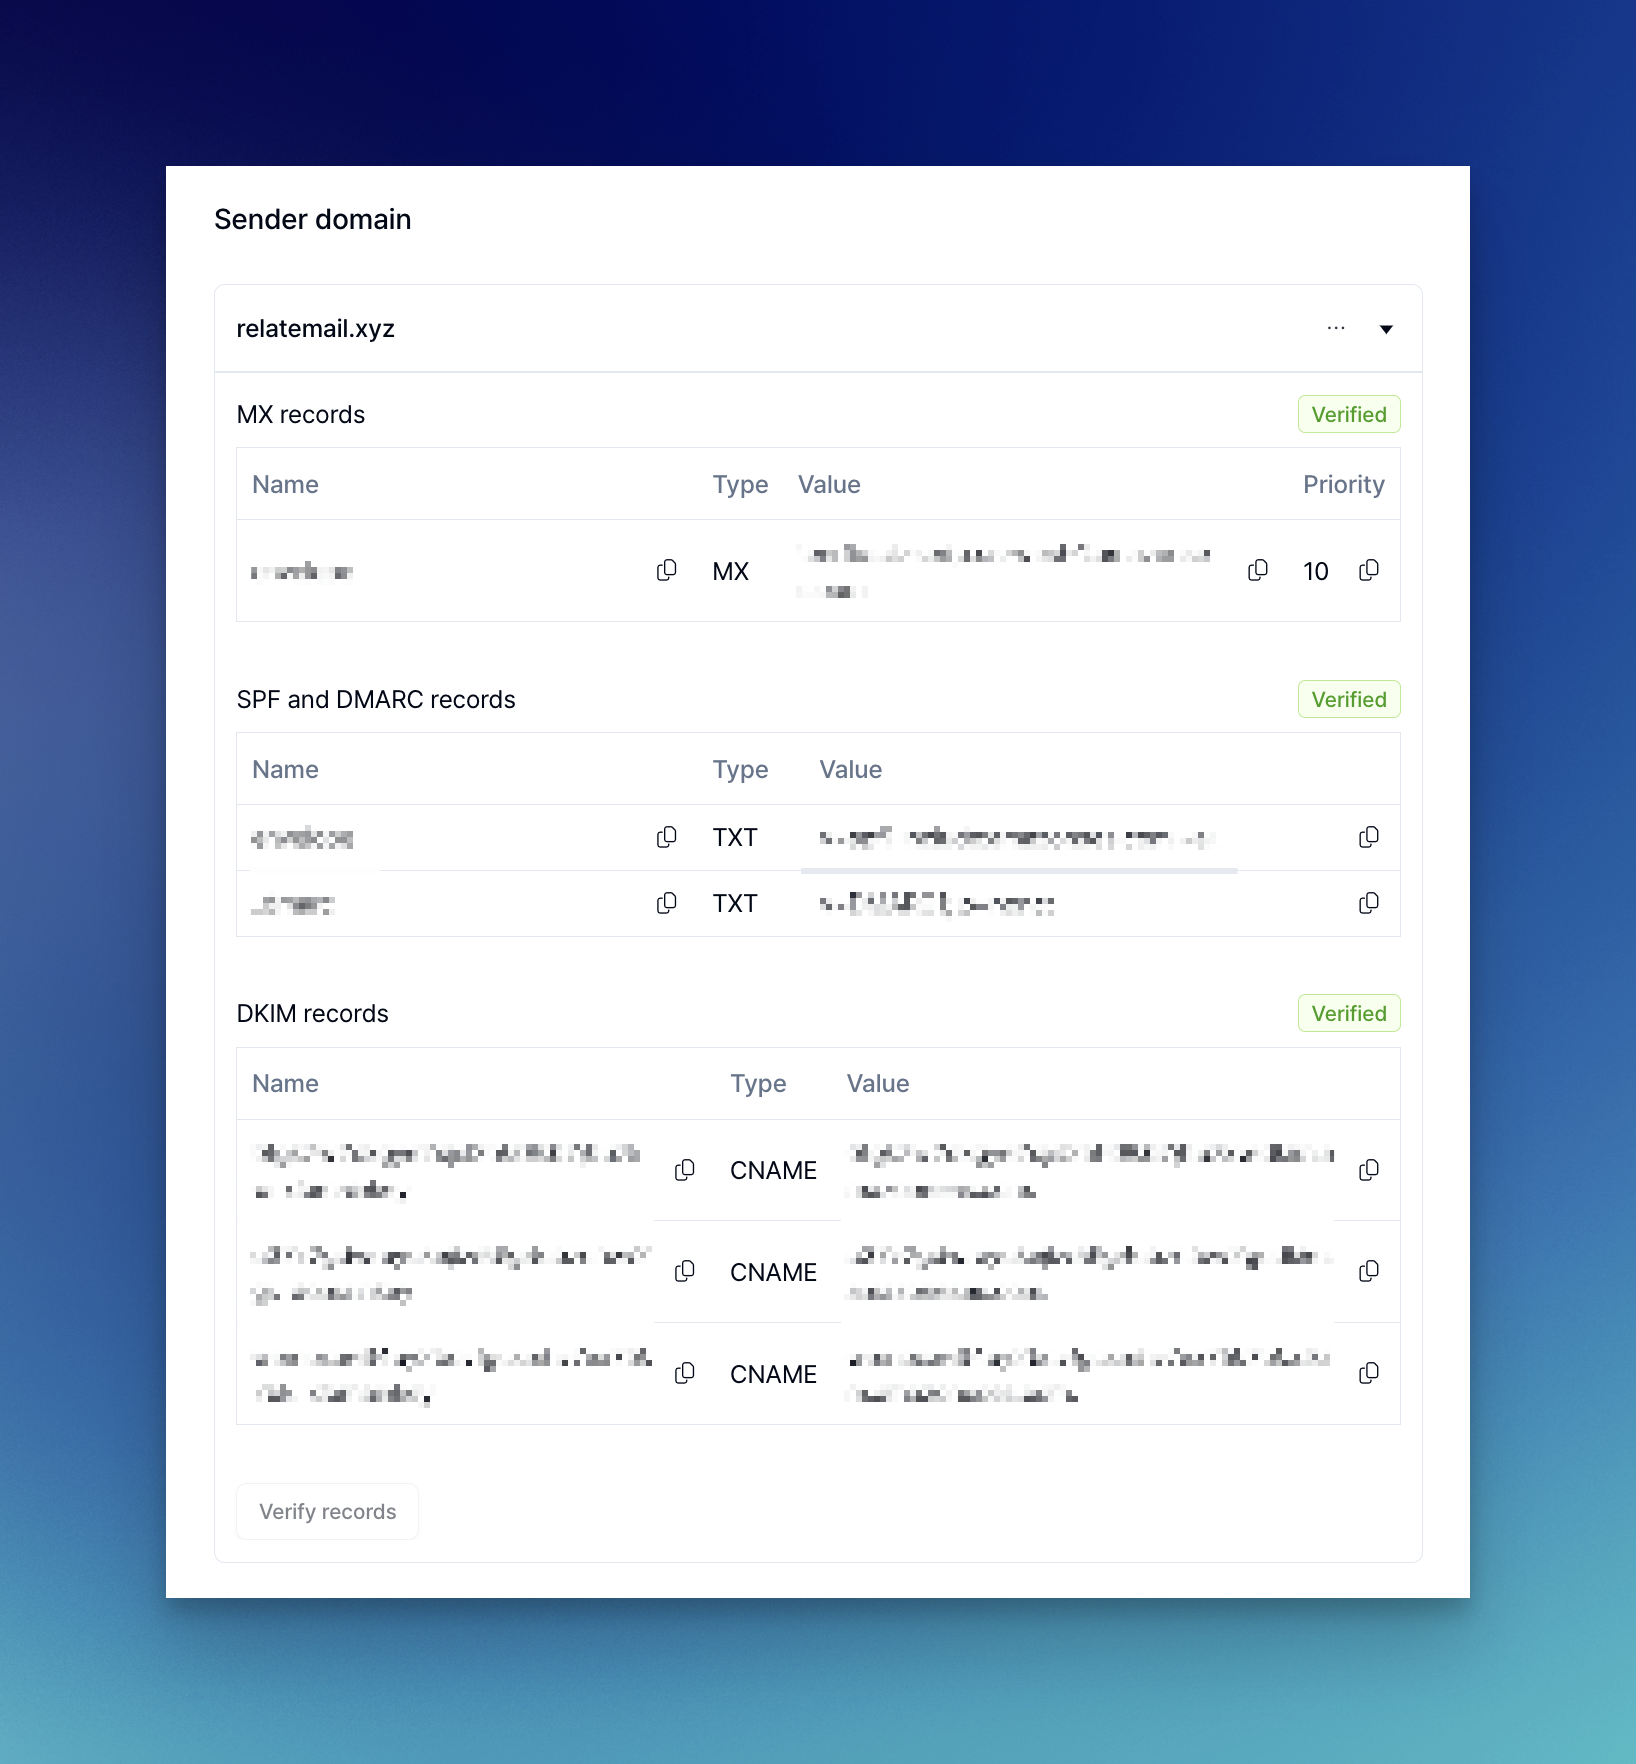 #### Set Sender Domain
This appears at the top as `senderdomain.com` (The screenshot shows relatemail.xyz as an example).
To change the domain, click the settings button on the right and select `Update domain`. Enter your desired domain here.
#### Domain Records
You can verify domain ownership and check MX records, SPF & DMARC records, and DKIM records for sending and deliverability. Click the clipboard icon to copy records and paste them into your DNS Records at domain registrars like Namecheap, AWS, or GoDaddy.
#### Verify Domain Settings
After setting up records, click the `Verify records` button at the bottom to confirm proper configuration.
## Step 2: Configure Domain Records
Copy and paste the MX, SPF & DMARC, and DKIM records into your DNS Record page. Below are examples for Cloudflare and GoDaddy. If you use a different domain management service and need help, email us at [we@relate.so](mailto:we@relate.so).
Add DNS records in the DNS page of your website.
Click **Add record**, select the **Type** (TXT, MX, or CNAME), then paste the **Name** and **Value** from the Relate domain settings page.
[Cloudflare DNS Records Guide](https://developers.cloudflare.com/dns/manage-dns-records/how-to/create-dns-records/#create-dns-records)
Make sure to set the proxy to `DNS Only` for CNAME records (orange button).
First, go to the `Advanced DNS` page for your domain.
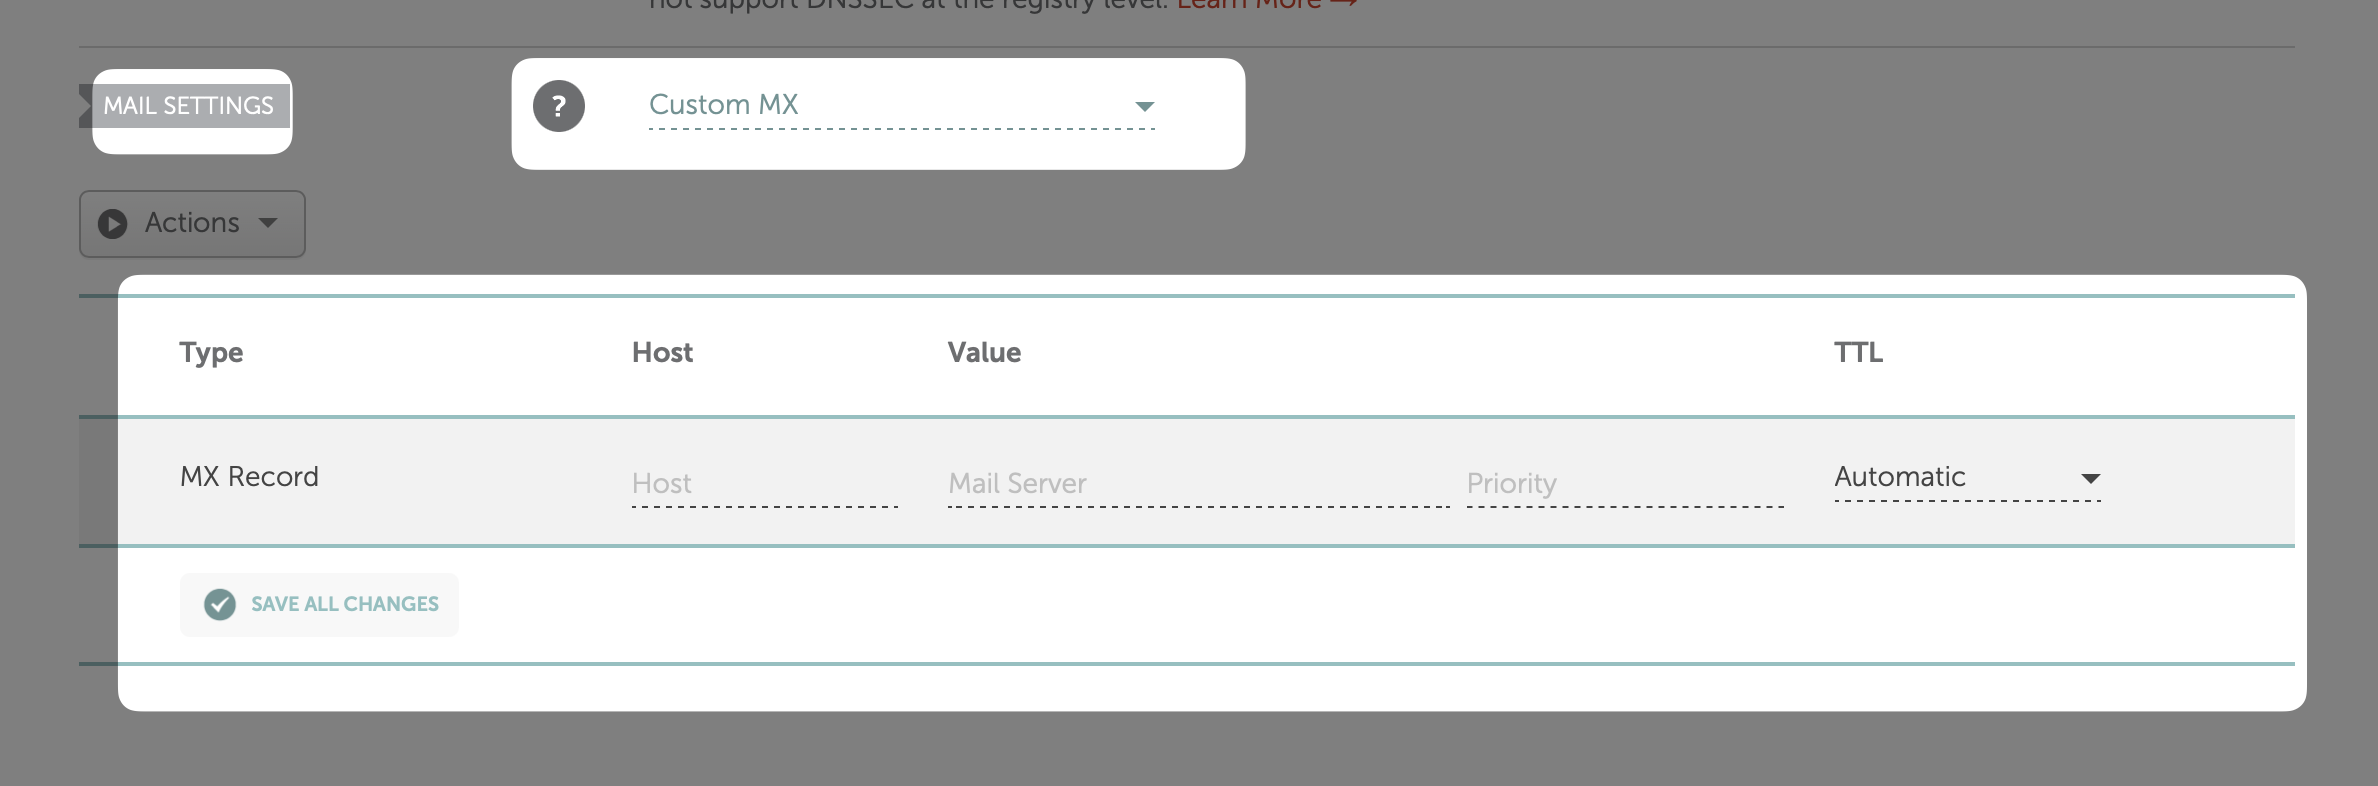
In `Mail Settings`, switch to **Custom MX**. If you use Namecheap's automatic Gmail/Gsuite integration, disable it first. Click `Save All Changes`.
If Gsuite records are already verified, check [this document](https://support.google.com/a/answer/174125) for proper MX records.
### How to Add Records
#### Adding MX Records
In the `Mail Settings` section, click `Add new record` and copy-paste the MX Record values from Relate into the Host and Value fields.
#### Set Sender Domain
This appears at the top as `senderdomain.com` (The screenshot shows relatemail.xyz as an example).
To change the domain, click the settings button on the right and select `Update domain`. Enter your desired domain here.
#### Domain Records
You can verify domain ownership and check MX records, SPF & DMARC records, and DKIM records for sending and deliverability. Click the clipboard icon to copy records and paste them into your DNS Records at domain registrars like Namecheap, AWS, or GoDaddy.
#### Verify Domain Settings
After setting up records, click the `Verify records` button at the bottom to confirm proper configuration.
## Step 2: Configure Domain Records
Copy and paste the MX, SPF & DMARC, and DKIM records into your DNS Record page. Below are examples for Cloudflare and GoDaddy. If you use a different domain management service and need help, email us at [we@relate.so](mailto:we@relate.so).
Add DNS records in the DNS page of your website.
Click **Add record**, select the **Type** (TXT, MX, or CNAME), then paste the **Name** and **Value** from the Relate domain settings page.
[Cloudflare DNS Records Guide](https://developers.cloudflare.com/dns/manage-dns-records/how-to/create-dns-records/#create-dns-records)
Make sure to set the proxy to `DNS Only` for CNAME records (orange button).
First, go to the `Advanced DNS` page for your domain.
In `Mail Settings`, switch to **Custom MX**. If you use Namecheap's automatic Gmail/Gsuite integration, disable it first. Click `Save All Changes`.
If Gsuite records are already verified, check [this document](https://support.google.com/a/answer/174125) for proper MX records.
### How to Add Records
#### Adding MX Records
In the `Mail Settings` section, click `Add new record` and copy-paste the MX Record values from Relate into the Host and Value fields.
 #### Adding SPF, DKIM, DMARC Records
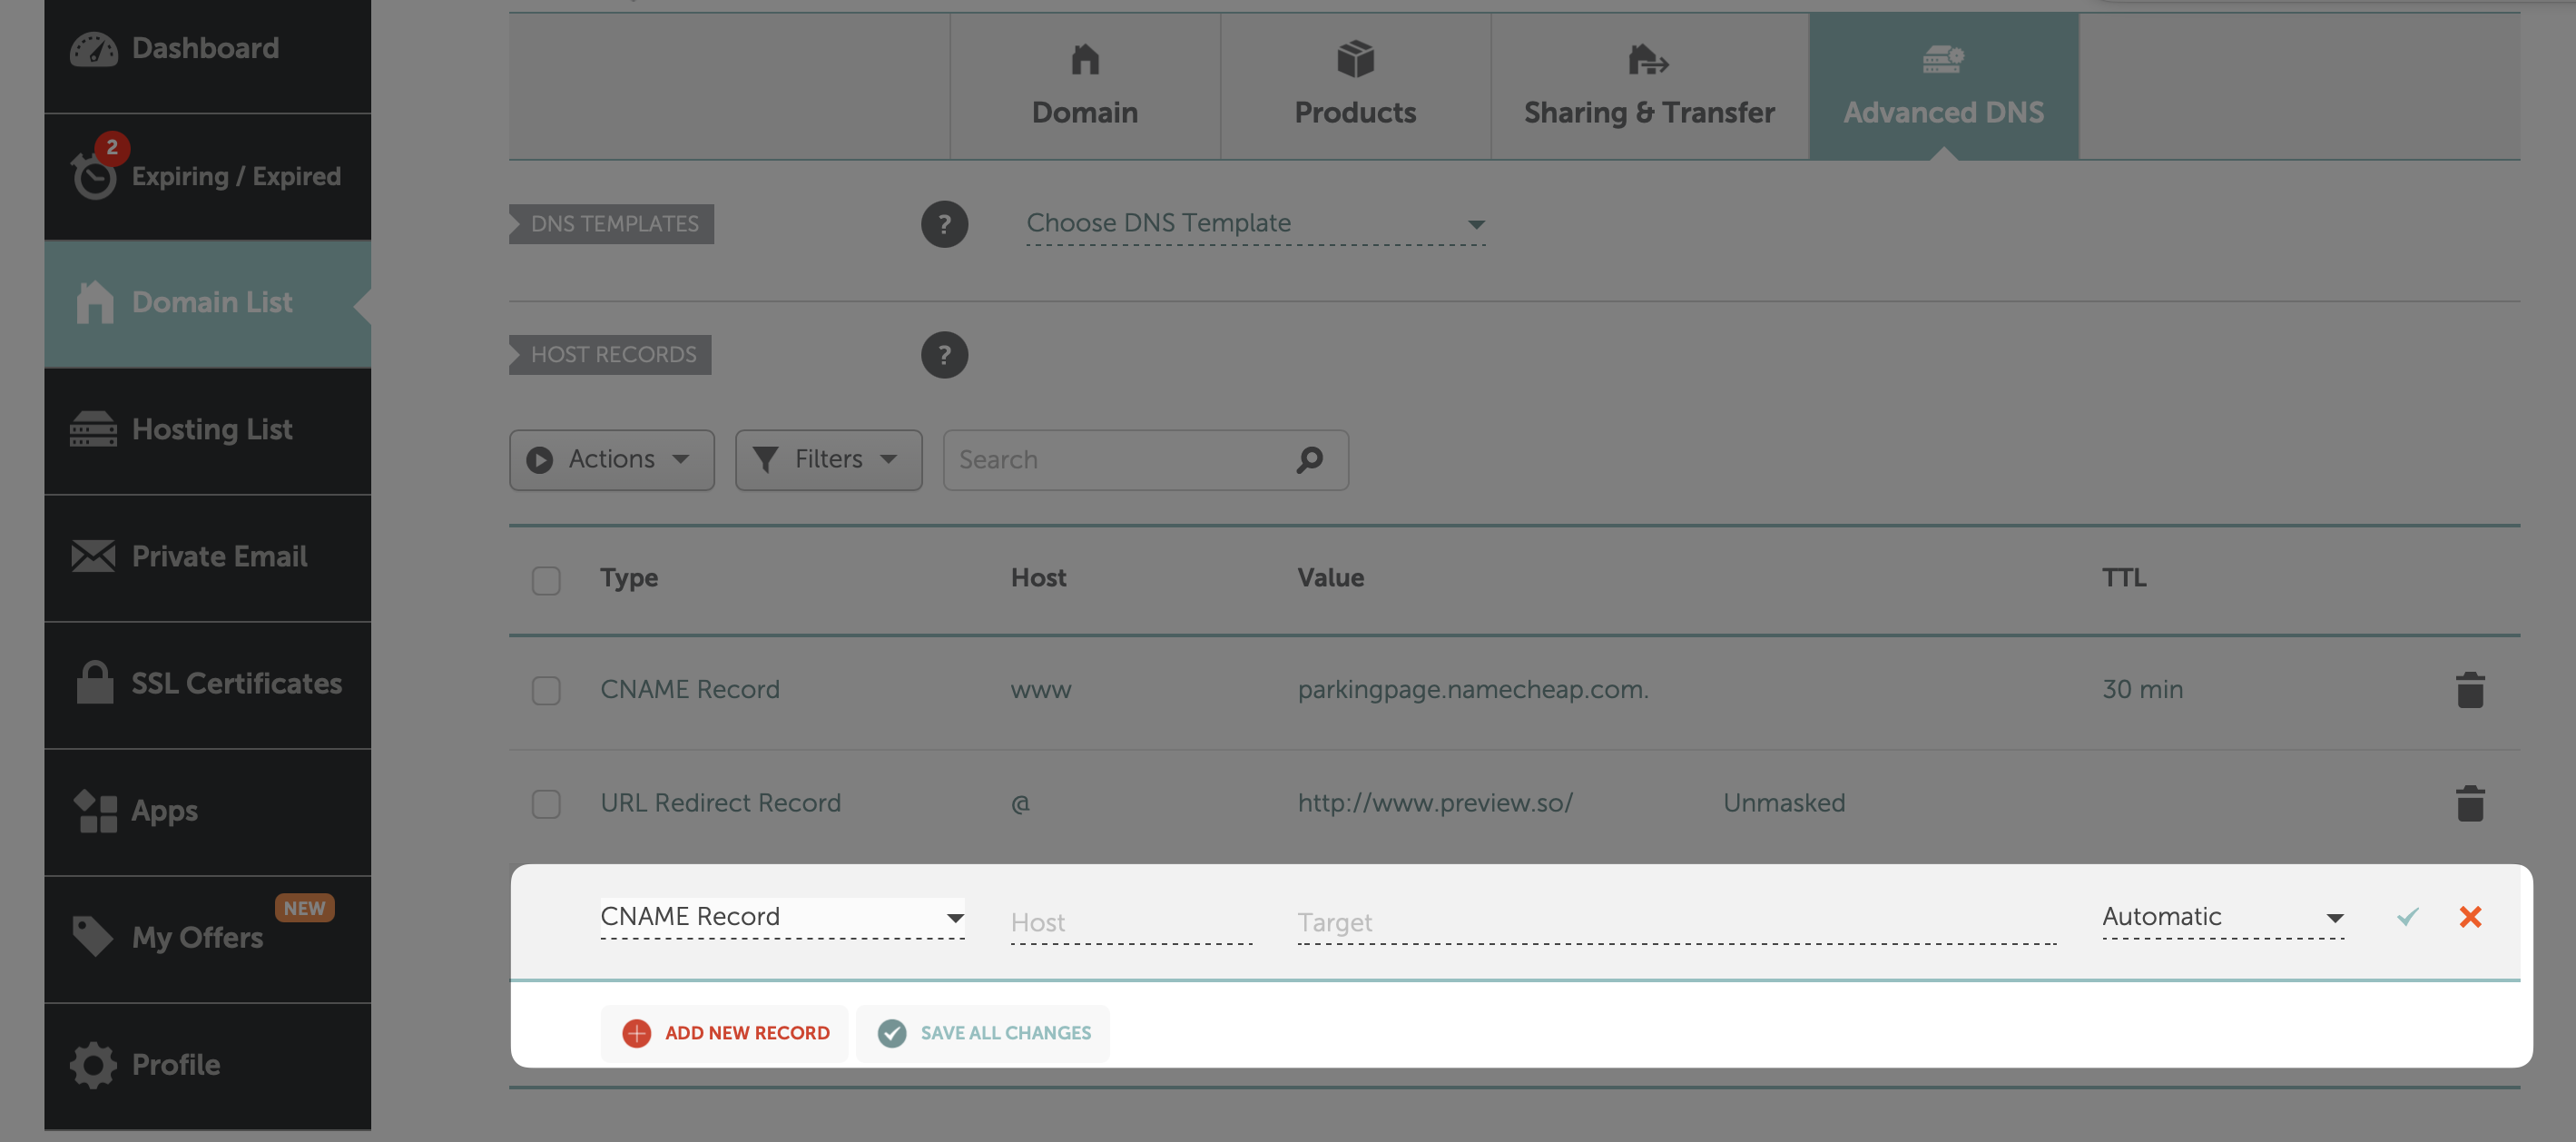
In the `Host Records` section, click to add new records and enter the TXT and CNAME Record values from Relate.
#### Adding SPF, DKIM, DMARC Records
In the `Host Records` section, click to add new records and enter the TXT and CNAME Record values from Relate.
 ## Step 3: Verify Records
After setting up records, click `Verify records` at the bottom of the Relate domain settings page.
Verification can take up to 1 hour.
When complete, each record section will show a green `Verified` status.
### Solving Partially verified of SPF and DMARC records
## Step 3: Verify Records
After setting up records, click `Verify records` at the bottom of the Relate domain settings page.
Verification can take up to 1 hour.
When complete, each record section will show a green `Verified` status.
### Solving Partially verified of SPF and DMARC records
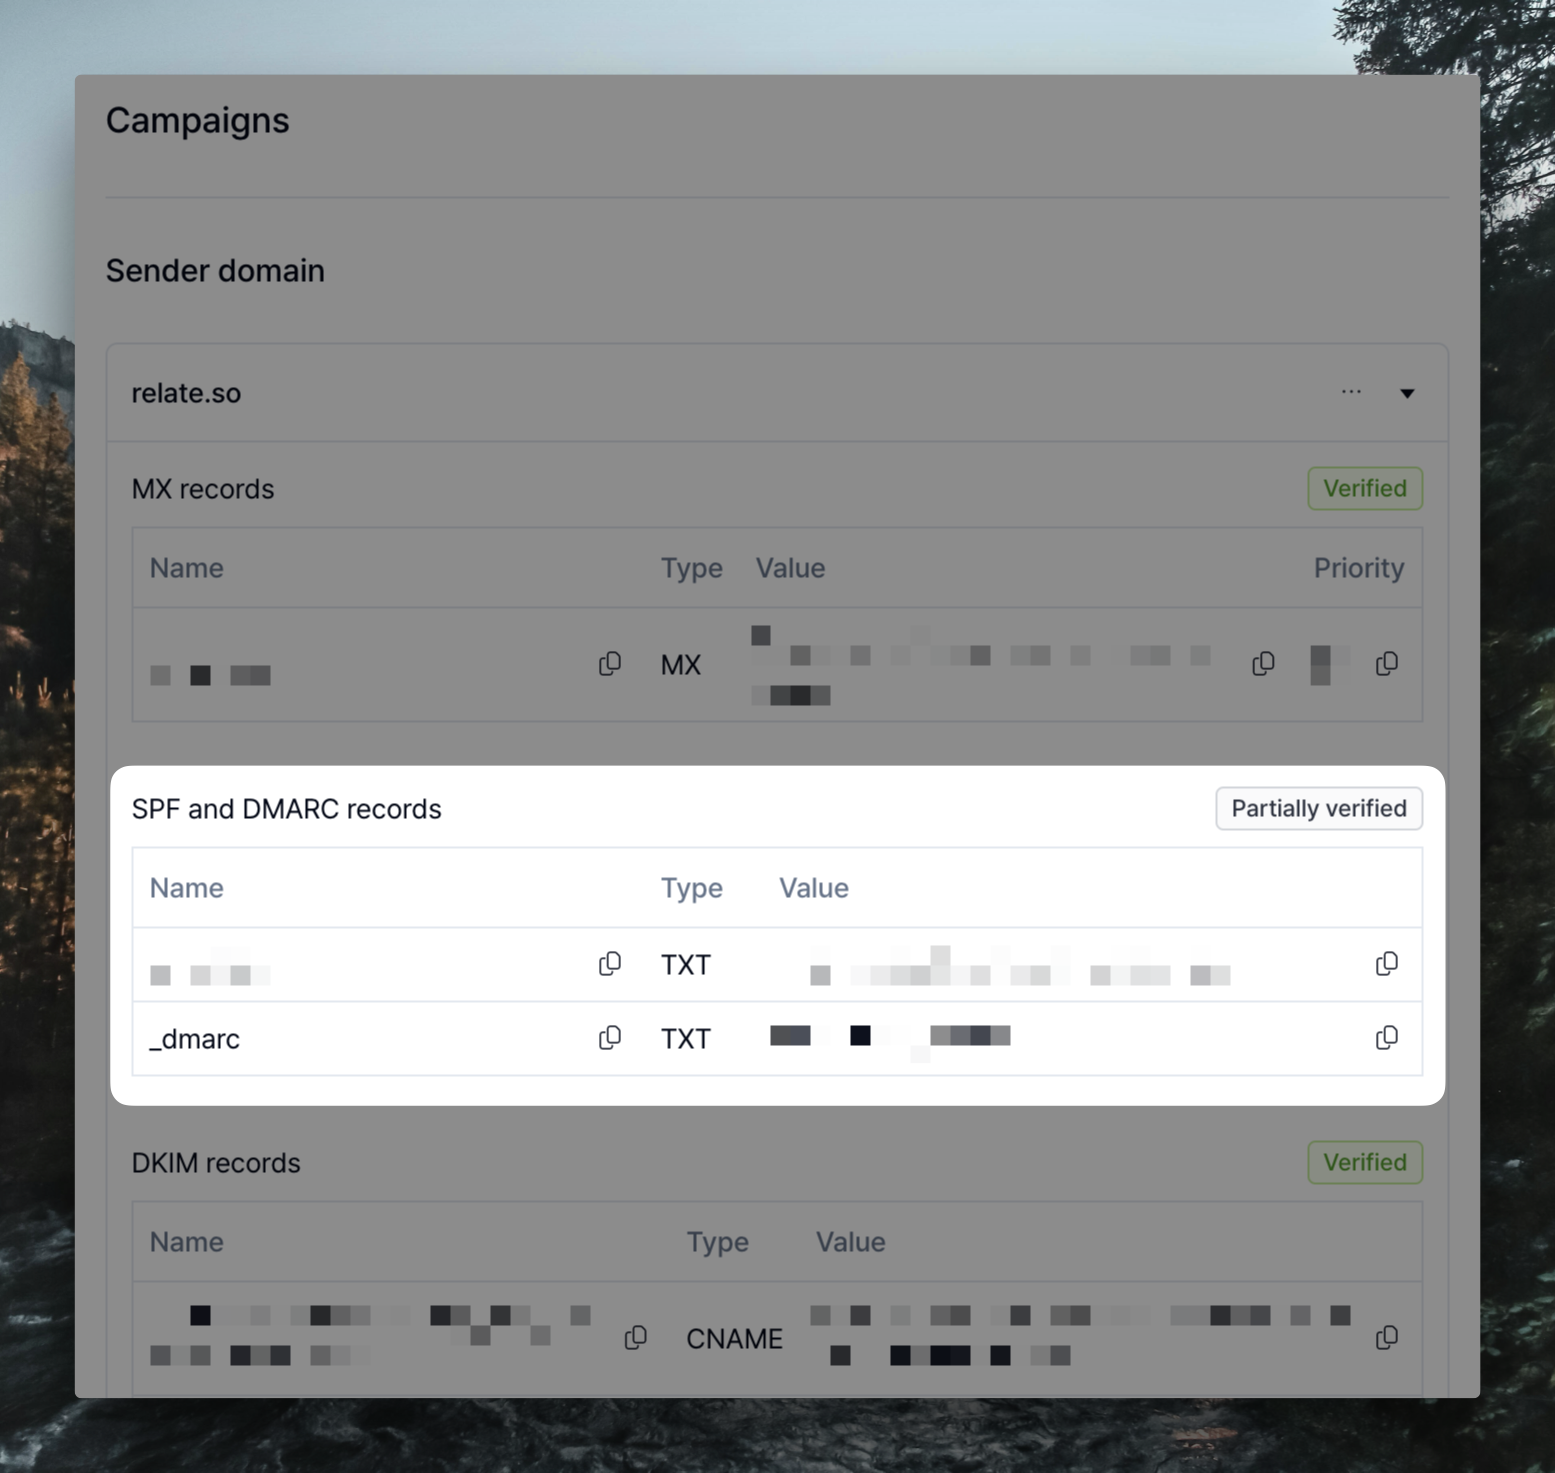 There are cases where SPF and DMARC records are displayed as `Partially verified` even though you have followed the steps above to set up the records.
In this case, the record setting is not complete, so please follow the steps below to check the record setting.
First, use the [DNS CHECKER](https://dnschecker.org/all-dns-records-of-domain.php?query=_dmarc.relate.so\&rtype=TXT\&dns=google) site to resolve to TXT type with **\_dmarc.domain** (e.g. \_dmarc.relate.so).
Copy the guide code provided here verbatim, make sure it works in Relate, and correct any deviations from the guide code.
For example, p=none; but you didn't include a semicolon (;), which caused an error.
If this doesn't work, please contact us at [we@relate.so](mailto:we@relate.so) or via the Contact Us button in the bottom right corner of the app.
There are cases where SPF and DMARC records are displayed as `Partially verified` even though you have followed the steps above to set up the records.
In this case, the record setting is not complete, so please follow the steps below to check the record setting.
First, use the [DNS CHECKER](https://dnschecker.org/all-dns-records-of-domain.php?query=_dmarc.relate.so\&rtype=TXT\&dns=google) site to resolve to TXT type with **\_dmarc.domain** (e.g. \_dmarc.relate.so).
Copy the guide code provided here verbatim, make sure it works in Relate, and correct any deviations from the guide code.
For example, p=none; but you didn't include a semicolon (;), which caused an error.
If this doesn't work, please contact us at [we@relate.so](mailto:we@relate.so) or via the Contact Us button in the bottom right corner of the app.